
零基础——用 AI Agent 做 qPCR 线粒体 DNA 拷贝数分析 | 全程复制粘贴
本教程以 workbuddy 作为 AI agent、Hy3 作为 AI API 为例。AI agent 本身的安装与配置请看AI Agent 安装教程。
在开始之前(必读):
- 如果你是第一次用 AI agent 做数据分析,强烈建议先跟一遍 bulk-RNA-seq 差异分析教程,熟悉"装技能 → 配环境 → 跑示例 → 换自己数据"的完整流程,再回来做本技能。
- 本技能是独立技能,不依赖任何其他技能的输出——给它一张原始 qPCR Ct 表就能跑。
- 一句话:从 ND1 / ND5 / B2M / POLG 四个 Ct 值算线粒体 DNA 相对拷贝数——自动按公式 Mean copy number = (2^(B2M-ND1) + 2^(POLG-ND5)) / 2 计算,自动统计(2 组 t 检验;≥3 组 Tukey HSD)并出 300 dpi 柱状图。
- 本技能用的是 Python(不是 R),环境配置比 RNA-seq 系列轻得多。
教程结构:
- Step 1|安装 qpcr-mtdna 技能(只需一次)
- Step 2|配置运行环境(只需一次)
- Step 3|跑通示例数据
- Step 4|换成你自己的数据
- Step 5|让 AI 解读结果
- 更多分析|相关技能简介(qPCR mRNA / 分组柱状图)
Step 1|Install the qpcr-mtdna skill
输入以下 prompt:
Please install the "qpcr-mtdna" skill for me, into the D:\claw2bio folder:
1. Create a folder named claw2bio in the root of the D: drive (if it doesn't exist yet).
2. From the GitHub repository https://github.com/nihuanhe/claw2bio, fetch ONLY the folder
   experiment-data/qpcr-mtdna (use sparse checkout — do NOT clone the whole repository),
   and place it at D:\claw2bio\qpcr-mtdna.
3. If downloading from GitHub fails or is too slow, download the zip from this mirror link instead:
   https://claw2bio.site/downloads/qpcr-mtdna.zip
   and extract it to D:\claw2bio\qpcr-mtdna.
4. Read the SKILL.md inside, then confirm to me that the skill is ready and list the contents
   of the folder.
(If my PC has no D: drive, install to C:\claw2bio instead and tell me the actual path.)
Step 1 完成后,打开文件管理器确认 D:\claw2bio\qpcr-mtdna 文件夹存在,里面有 scripts/、examples/、SKILL.md 等内容。
Step 2|Set up the runtime environment
输入 prompt:
Please set up the runtime environment for the "qpcr-mtdna" skill at D:\claw2bio\qpcr-mtdna:
1. First, SEARCH THIS PC for an existing Python installation. If Python is already installed,
   report its version to me. Only if Python is NOT installed at all, install a recent Python 3
   (Windows), downloaded from the official python.org website, accepting all default options —
   and make sure to check "Add python.exe to PATH" during installation.
2. Install all Python packages this skill needs: pandas, numpy, scipy, matplotlib
   (use pip; if a package fails or is too slow, stop and tell me about it).
3. When everything is installed, confirm to me that the skill can run.
Step 2 结束后,AI agent 会告诉你本机的 Python 版本和依赖安装结果。
Step 3|跑通示例数据
输入 prompt:
The skill is installed at D:\claw2bio\qpcr-mtdna. Please run the bundled example:
1. Example input is at D:\claw2bio\qpcr-mtdna\examples\input\mtDNA-input.csv
2. Write results to D:\claw2bio\qpcr-mtdna\examples\output\ with the output name "Figure18B".
3. Prefer the skill's own scripts in scripts/ — do NOT write new analysis code from scratch.
4. When the run succeeds, show me the result barplot and the Figure18B.csv table; explain
   both to me.
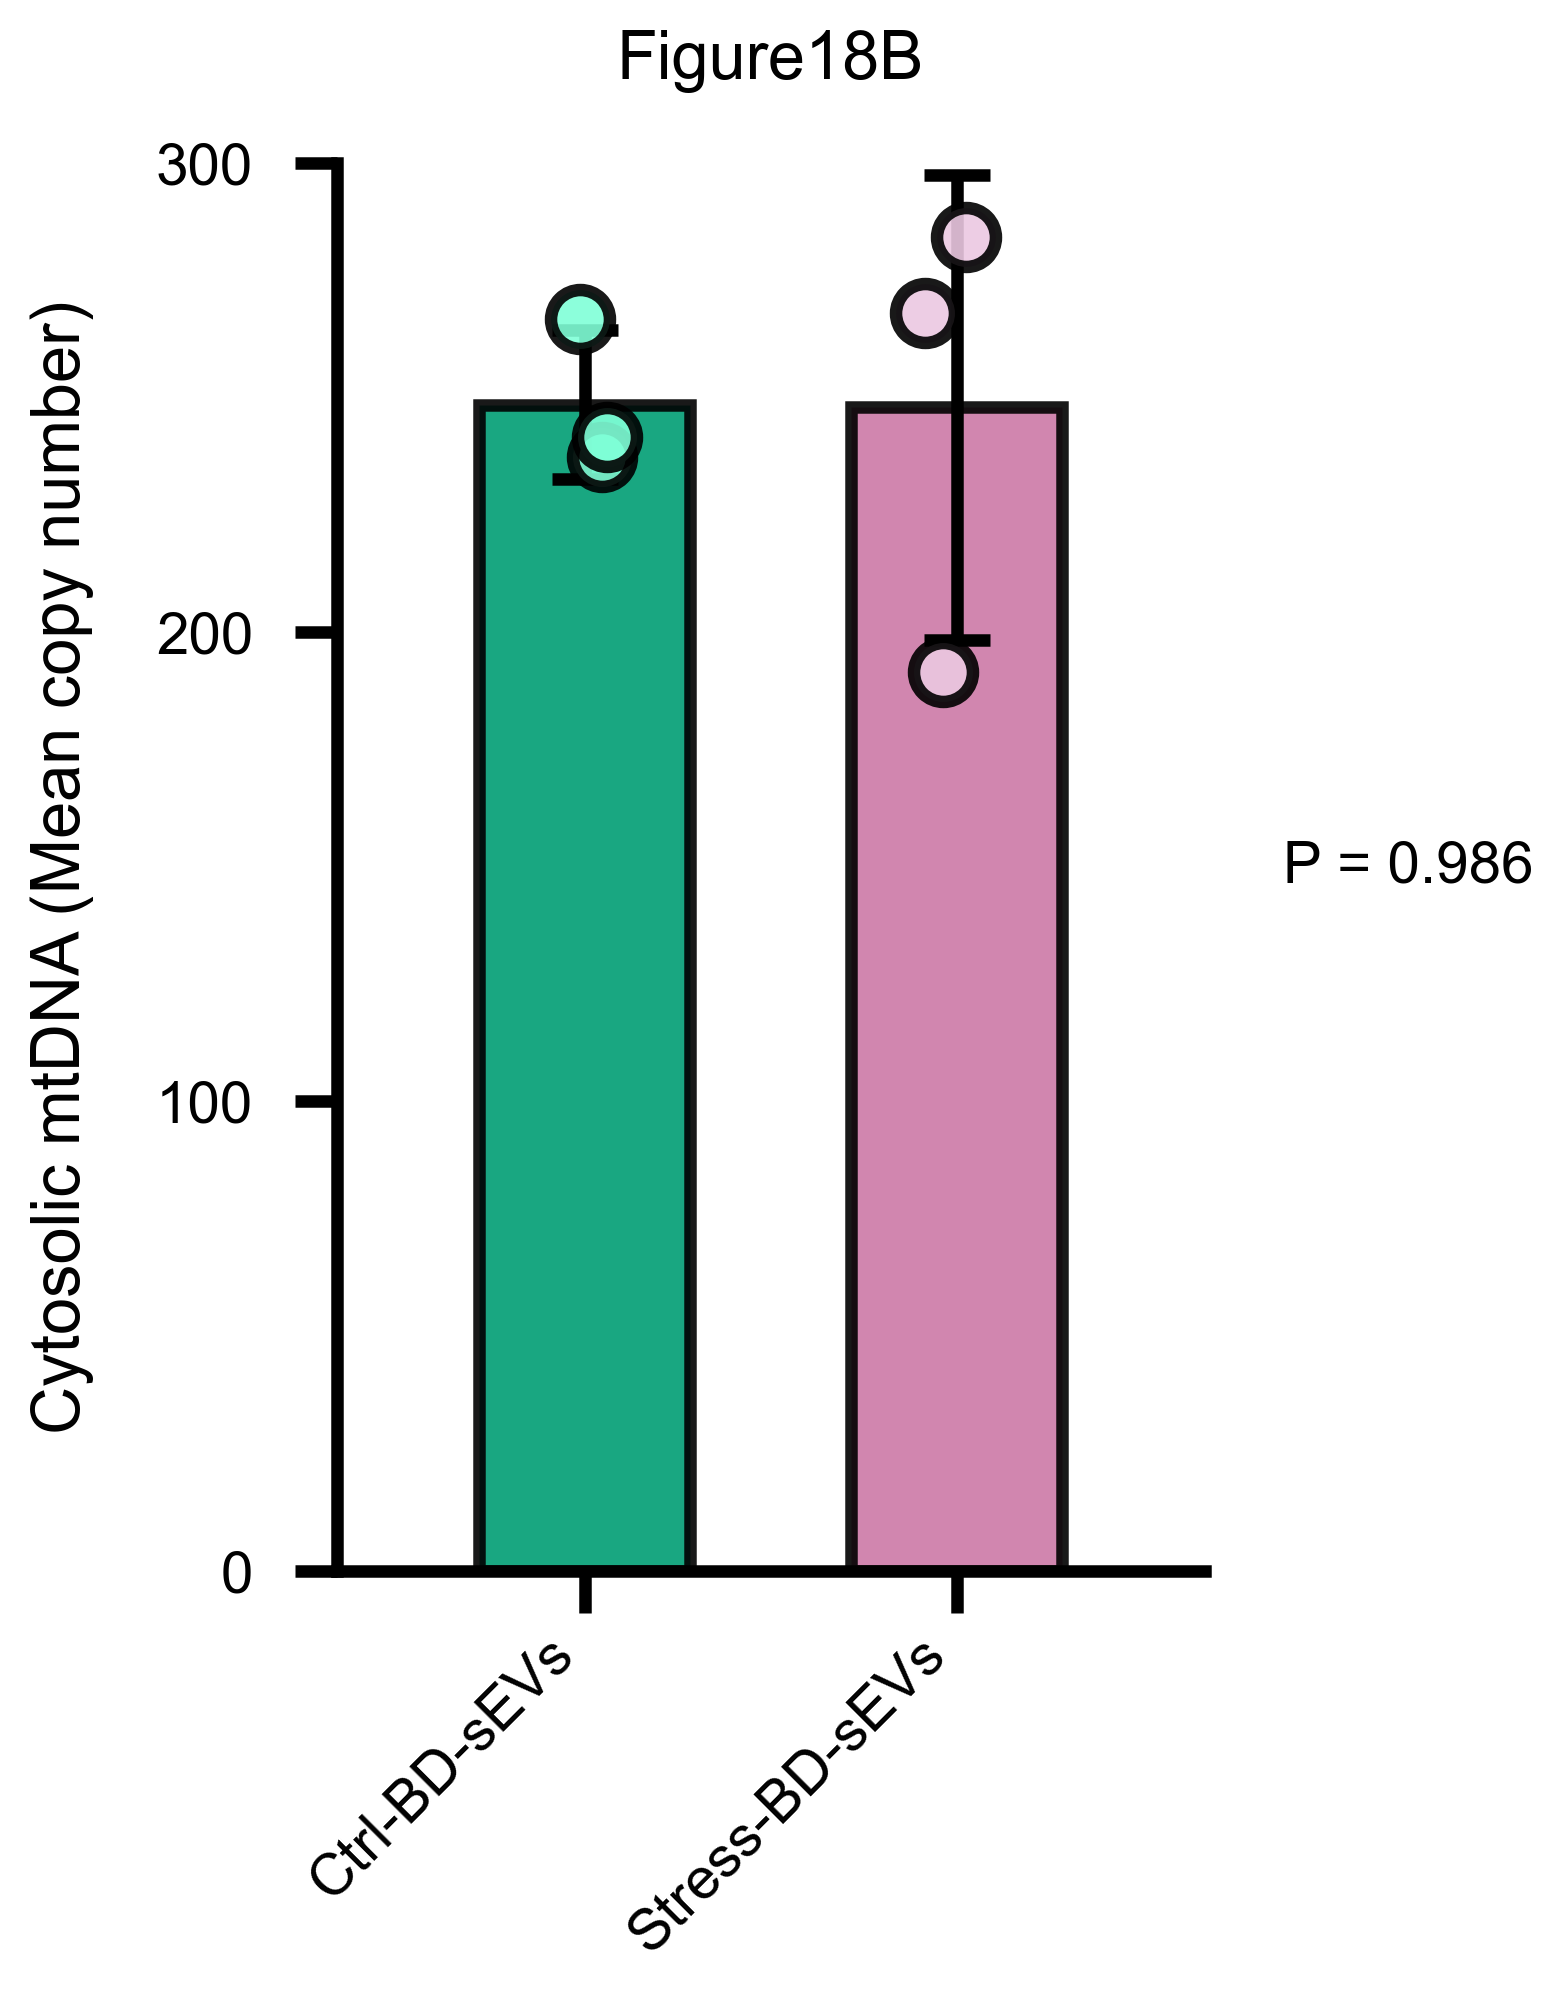
运行成功后,会得到一张带统计标注的 300 dpi 柱状图和一张含 ΔCt / 2^ΔCt / Mean copy number 列的结果表。示例数据的锚点结果:P = 0.986(ns,无显著差异)——如果你的结果与此一致,说明环境和流程都没问题。
Step 4|换成你自己的数据
把你自己的原始 Ct 表交给它。注意格式硬性要求:表必须正好包含 ND1 Ct、ND5 Ct、B2M Ct、POLG Ct 四行(Target 列要带 "Ct" 后缀),每行格式为 Target, Sample, Rep1, Rep2, Rep3。输入 prompt:
My own mtDNA qPCR Ct table is at: <paste the path to your CSV file here>.
1. First check whether my table has any format problems — it MUST contain exactly these four
   Target rows: "ND1 Ct", "ND5 Ct", "B2M Ct", "POLG Ct" (note the "Ct" suffix), each with
   columns Target, Sample, Rep1, Rep2, Rep3. If anything is missing or misspelled, fix it and
   tell me what you did.
2. Once the data checks out, run the full mtDNA copy-number analysis with the output name
   <e.g., Figure3>, and show me the result barplot plus the result CSV.
3. Prefer the skill's own scripts in scripts/; if anything needs adapting, make the smallest
   possible change — do NOT write large amounts of new code.
4. If you see that I have MANY input CSV files in one folder, tell me that the skill also has
   a batch script (scripts/batch_mtdna.py) that can process a whole directory at once, and ask
   me whether I want batch mode.
等候 AI agent 运行结束:出一张带统计标注的 300 dpi 柱状图(2 组 t 检验;≥3 组 Tukey HSD),外加一张含 ΔCt / 2^ΔCt / Mean copy number 列的结果 CSV。
Step 5|让 AI 解读结果
输入 prompt:
Please explain the result CSV and the barplot in my output folder line by line:
1. What each column in the CSV means (raw Ct, Delta Ct, 2^Delta Ct, Mean copy number);
2. Explain the formula Mean copy number = (2^(B2M-ND1) + 2^(POLG-ND5)) / 2 in plain language —
   why ND1/ND5 are the mitochondrial targets and B2M/POLG the nuclear references;
3. How the mtDNA copy number differs between my groups, and whether the difference is
   statistically significant (which test was used and why);
4. Any warnings or things I should pay attention to (e.g., high Ct replicate variation).
After explaining, tell me which figures can be used directly in a paper or presentation.
阅读完 AI 的解释,如果有不懂的直接问它。
更多分析
本技能只做 mtDNA 相对拷贝数分析。下面两个技能与它相关,安装方式完全相同(一键 prompt 或网站下载 zip 包):
qPCR mRNA(ΔΔCt)—— qpcr-mrna
一句话:ΔΔCt 法相对表达量分析,从原始 Ct 表直接产出每个靶基因一张发表级柱状图。 自动以内参基因归一化,自动选统计方法。
详细介绍与下载:/zh/skills/qpcr-mrna
分组柱状图 —— barplot
一句话:任何 2–6 组的实验数据(ELISA、WB 灰度、细胞计数……)一键出带统计标注的柱状图。 给一张宽表 CSV 就行,自动选统计方法。
详细介绍与下载:/zh/skills/barplot