
零基础——用 AI Agent 画发表级进化树(phylo-tree-plot) | 全程复制粘贴
本教程以 workbuddy 作为 AI agent、Hy3 作为 AI API 为例。AI agent 本身的安装与配置请看AI Agent 安装教程。
在开始之前(必读):
- 如果你是第一次用 AI agent 做生信分析,强烈建议先跟一遍 bulk-RNA-seq 差异分析教程,熟悉"装技能 → 配环境 → 跑示例 → 换自己数据"的完整流程,再回来做本技能。
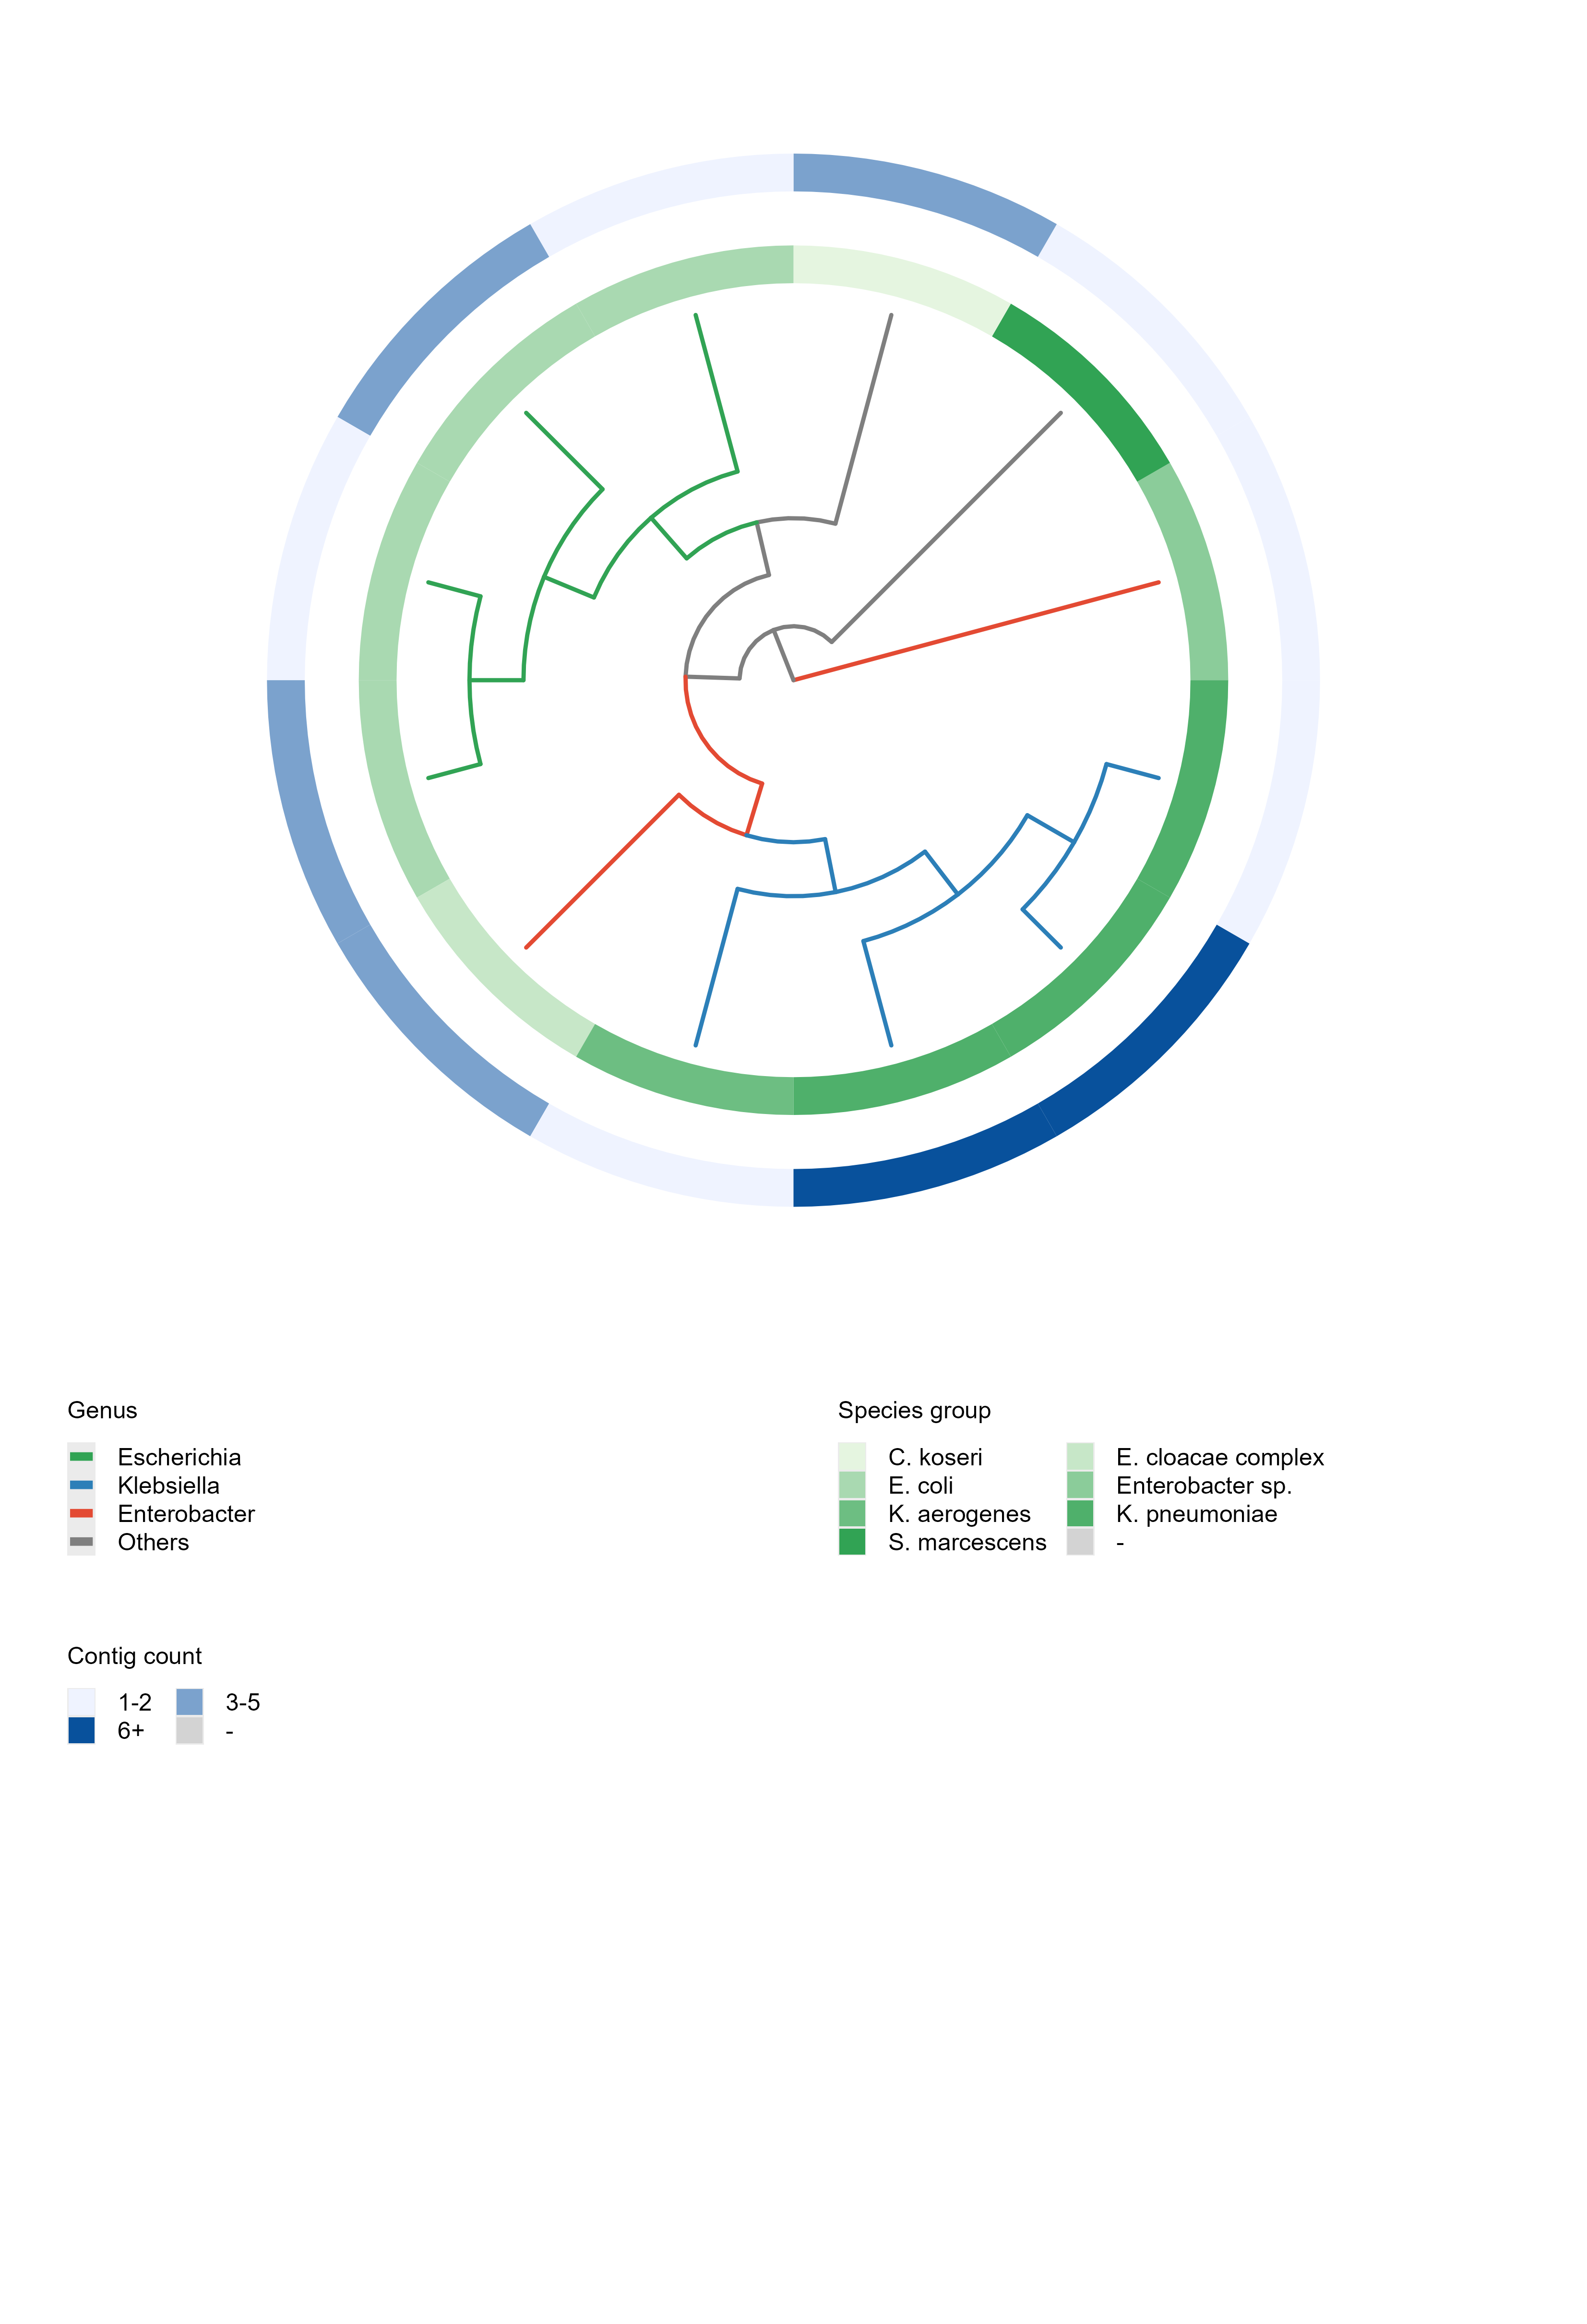
- 一句话:treefile + 注释表进,带注释环的发表级进化树图出——中点生根、枝干按分组着色、每个注释列一圈外环(自动配色)、树下独立图例网格,600 dpi PNG + 内嵌字体 PDF。
- 本技能直接吃 phylo-tree-build 产出的
.treefile,但任何 Newick 格式的树文件都能画。 - 好消息:本技能在 Windows 的 R 里直接跑,不需要 WSL(建树才需要 WSL,画图不需要)。
- 本技能是模板脚本(不是命令行工具):换数据就是拷贝模板、改顶部 CONFIG 块——放心,Step 4 的 prompt 会让 AI 替你改,你不用动手。
教程结构:
- Step 1|安装 phylo-tree-plot 技能(只需一次)
- Step 2|配置运行环境(只需一次)
- Step 3|跑通示例数据
- Step 4|换成你自己的数据
- Step 5|读懂 REPORT.md
- 更多分析|配套技能简介(进化树建树)
Step 1|Install the phylo-tree-plot skill
输入以下 prompt:
Please install the "phylo-tree-plot" skill for me, into the D:\claw2bio folder:
1. Create a folder named claw2bio in the root of the D: drive (if it doesn't exist yet).
2. From the GitHub repository https://github.com/nihuanhe/claw2bio, fetch ONLY the folder
   bioinformatics/phylo-tree/phylo-tree-plot (use sparse checkout — do NOT clone the whole
   repository), and place it at D:\claw2bio\phylo-tree-plot.
3. If downloading from GitHub fails or is too slow, download the zip from this mirror link instead:
   https://claw2bio.site/downloads/phylo-tree-plot.zip
   and extract it to D:\claw2bio\phylo-tree-plot.
4. Read the SKILL.md inside, then confirm to me that the skill is ready and list the contents
   of the folder.
(If my PC has no D: drive, install to C:\claw2bio instead and tell me the actual path.)
Step 1 完成后,打开文件管理器确认 D:\claw2bio\phylo-tree-plot 文件夹存在,里面有 scripts/、examples/、SKILL.md 等内容。
Step 2|Set up the runtime environment
如果你已经按 bulk-RNA-seq 教程装好了 R(4.5 或以上),这一步主要是补装画图专用的 R 包。输入 prompt:
Please set up the runtime environment for the "phylo-tree-plot" skill at
D:\claw2bio\phylo-tree-plot:
1. R should already be installed from the bulk-RNA-seq tutorial — verify that R is installed
   and report its version to me (it must be 4.1 or above; 4.5+ recommended). If R is missing,
   stop and tell me.
2. Install all R packages this skill needs: ggtree, treeio, ggplot2, ggnewscale, RColorBrewer,
   viridis, cowplot, phytools. NOTE: ggtree and treeio come from BIOCONDUCTOR (use
   BiocManager::install), the rest from CRAN. If any package fails or is too slow, stop and
   tell me about it.
3. When everything is installed, confirm to me that the skill can run.
Step 2 结束后,AI agent 会告诉你依赖是否全部装好。
Step 3|跑通示例数据
输入 prompt:
The skill is installed at D:\claw2bio\phylo-tree-plot. Please run the bundled example:
1. Run the template script as-is: Rscript scripts/plot_tree_template.R — it auto-locates the
   example treefile and annotation CSV.
2. Prefer the skill's own scripts in scripts/ — do NOT write new analysis code from scratch.
3. When the run succeeds, show me the output figure (600 dpi PNG), and the console anchor
   lines (they should report "tips: 12" and the ring levels). Then explain the generated
   REPORT.md line by line.
运行成功后,你应该看到带注释环和图例网格的进化树图(示例:phylo-tree-build 对 12 个公开 NCBI 基因组所建的树 + 物种元数据注释,控制台锚点 tips: 12):
Step 4|换成你自己的数据
准备两样东西:
- 树文件:Newick 格式,tip 标签 = 样本 ID(phylo-tree-build 的产出天然满足);
- 注释 CSV:必须有表头;首列
SampleID与树的 tip 标签一一对应;其余列是任意分类注释(连续值先分箱,每个不同值占一个配色);无值的格子填-(画成灰色)。
输入 prompt:
My own tree file is at: <paste the path to your .treefile / .nwk file here>.
My annotation CSV is at: <paste the path to your annotation CSV here>.
1. First check my inputs: the tree is valid Newick; every tip label appears EXACTLY once in
   the SampleID column of my CSV (the skill's stopifnot check will fail loudly otherwise —
   never silently drop tips); annotation columns are categorical (if a column is continuous,
   suggest binning it first; if a column has more than ~30 distinct values, warn me that the
   colors will be unreadable and suggest binning or dropping it); empty cells are filled
   with "-". If there are problems, fix them and tell me what you did.
2. This skill is a TEMPLATE script, not a CLI: copy scripts/plot_tree_template.R to a new file
   next to my data, then edit ONLY the CONFIG (EDIT THIS BLOCK) section at the top — set
   TREEFILE and ANN_CSV to my files, set GROUP_COL to <the column for branch coloring>, set
   RING_COLS to <the columns to draw as annotation rings>, and LAYOUT to <circular /
   rectangular>. Do NOT change anything outside the CONFIG block, and do NOT write new
   analysis code from scratch.
3. Run the edited script, then show me the output figure and explain the REPORT.md line by line.
4. If the rings look too thin or overlap, adjust ONLY RING_GAP / RING_WIDTH / TREE_H_CM in the
   CONFIG block and re-run.
等候 AI agent 运行结束:一张带注释环和图例网格的 600 dpi PNG + cairo PDF,外加各图例的独立小 PNG(方便单独取用)。
Step 5|读懂 REPORT.md
输入 prompt:
Please explain the REPORT.md in my tree-plot results folder line by line:
1. What each output file is and what it contains (the main figure PNG/PDF, the standalone
   legend PNGs);
2. Walk me through MY tree figure: which clades group together, how the branch colors and
   each annotation ring should be read, and whether the groupings match the metadata
   (e.g., do same-group tips cluster together?);
3. Any warnings or things I should pay attention to.
After explaining, tell me which files can be used directly in a paper or presentation
(the PDF is vector with embedded fonts, best for journals; the 600 dpi PNG is best for
slides).
阅读完 AI 的解释,如果有不懂的直接问它。
更多分析
本技能只负责画图。如果你还没有树文件,用配套技能建树,安装方式与本技能完全相同(一键 prompt 或网站下载 zip 包):
进化树 · 建树 —— phylo-tree-build
一句话:一个目录的基因组 fasta 进,Newick 树文件出。 bcgTree 拼接核心基因 + IQ-TREE2 自动选模 + 1000 次超快自举,脚本来自已发表的 67 株 CRE 研究实战流程。注意建树需要 WSL2 + Ubuntu 24.04。
详细介绍与下载:/zh/skills/phylo-tree-build