
零基础——用 AI Agent 做临床统计表(clinical-table) | 全程复制粘贴
本教程以 workbuddy 作为 AI agent、Hy3 作为 AI API 为例。AI agent 本身的安装与配置请看AI Agent 安装教程。
在开始之前(必读):
- 如果你是第一次用 AI agent 做数据分析,强烈建议先跟一遍 bulk-RNA-seq 差异分析教程,熟悉"装技能 → 配环境 → 跑示例 → 换自己数据"的完整流程,再回来做本技能。
- 本技能是独立技能,不依赖任何其他技能的输出——给一张患者级 CSV 就能跑。
- 一句话:患者级 CSV 进,论文 Table 1 基线特征表出——分类变量 n (%) + χ²(期望 <5 自动 Fisher)+ 连续变量 mean±SD + t 检验;另支持相关性矩阵、Cox 回归、OR 汇总。输出 Markdown 三线表,可用 Pandoc 一键转 DOCX。
- 本技能有两种用法,本教程主线讲通用引擎(Python,开箱即用);文末"进阶"介绍手稿级全套表格 R 管线(9 个 R 脚本 + 1 个 Python 脚本,从患者级 CSV 复现一篇论文的 Table 1–10)。
- 注意:本技能的 χ² 不做 Yates 连续性校正(发表 Table 1 的惯例),所以 p 值可能和 SPSS 对不上——这是特性,不是 bug。
教程结构:
- Step 1|安装 clinical-table 技能(只需一次)
- Step 2|配置运行环境(只需一次)
- Step 3|跑通示例数据(通用引擎)
- Step 4|换成你自己的数据
- Step 5|让 AI 解读结果
- 进阶|手稿级全套表格 R 管线
- 更多分析|相关技能简介(生存曲线 / 分组柱状图)
Step 1|Install the clinical-table skill
输入以下 prompt:
Please install the "clinical-table" skill for me, into the D:\claw2bio folder:
1. Create a folder named claw2bio in the root of the D: drive (if it doesn't exist yet).
2. From the GitHub repository https://github.com/nihuanhe/claw2bio, fetch ONLY the folder
   figure-generation/clinical-table (use sparse checkout — do NOT clone the whole repository),
   and place it at D:\claw2bio\clinical-table.
3. If downloading from GitHub fails or is too slow, download the zip from this mirror link instead:
   https://claw2bio.site/downloads/clinical-table.zip
   and extract it to D:\claw2bio\clinical-table.
4. Read the SKILL.md inside, then confirm to me that the skill is ready and list the contents
   of the folder.
(If my PC has no D: drive, install to C:\claw2bio instead and tell me the actual path.)
Step 1 完成后,打开文件管理器确认 D:\claw2bio\clinical-table 文件夹存在,里面有 scripts/、examples/、SKILL.md 等内容。
Step 2|Set up the runtime environment
通用引擎只需要 Python(进阶 R 管线才需要 R + logistf 包)。输入 prompt:
Please set up the runtime environment for the "clinical-table" skill at
D:\claw2bio\clinical-table:
1. First, SEARCH THIS PC for an existing Python installation. If Python is already installed,
   report its version to me. Only if Python is NOT installed at all, install a recent Python 3
   (Windows), downloaded from the official python.org website, accepting all default options —
   and make sure to check "Add python.exe to PATH" during installation.
2. Install all Python packages this skill needs: pandas, numpy, scipy, statsmodels
   (use pip; if a package fails or is too slow, stop and tell me about it).
3. The general engine is Python-only. The advanced R pipeline additionally needs R with the
   logistf package — check whether R is installed; if yes, also install logistf; if no,
   just tell me that the R pipeline won't be available (I can still use the general engine).
4. When everything is installed, confirm to me what is ready.
Step 3|跑通示例数据(通用引擎)
输入 prompt:
The skill is installed at D:\claw2bio\clinical-table. Please run the bundled example with the
GENERAL ENGINE:
1. Example input is at D:\claw2bio\clinical-table\examples\input\clinical_cohorts.csv
2. Run: python scripts/clinical_table.py examples/input/clinical_cohorts.csv
   examples/output/clinical_tables.md
3. Prefer the skill's own scripts in scripts/ — do NOT write new analysis code from scratch.
4. When the run succeeds, show me the generated clinical_tables.md and explain it table by
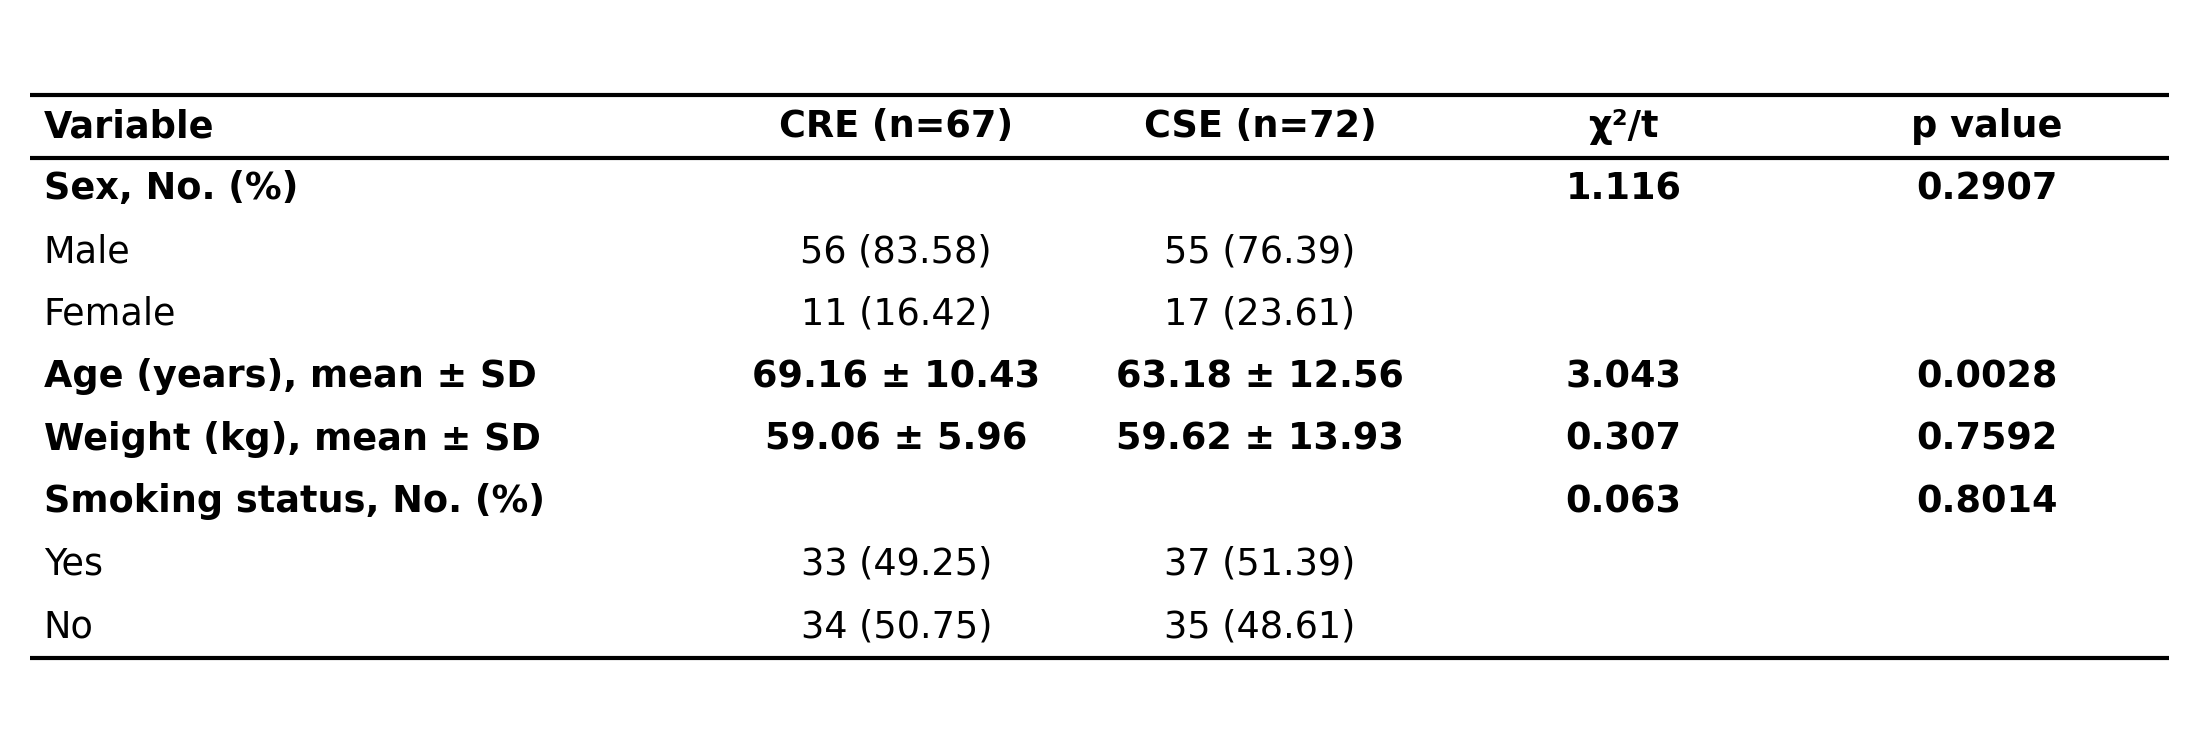
table.运行成功后的锚点结果:CRE n=67、CSE n=72;Age 69.16±10.43 vs 63.18±12.56,p=0.003。你的结果与此一致即说明环境正常。技能页上有用 R 管线对真实队列数据产出的全套 10 张表的效果图(Table 1 基线表如下,你的网站实跑结果会替换成自己的截图):
把三线表转成 Word:Markdown 表格可用 Pandoc 一键转 DOCX——让 AI 执行 pandoc output.md -o output.docx(如果没装 Pandoc,让 AI 帮你装)。
Step 4|换成你自己的数据
准备一张患者级 CSV(一行一个患者):一个两水平分组列(默认列名 cohort)+ 若干 0/1 二分类列 + 若干连续列。输入 prompt:
My own patient-level CSV is at: <paste the path to your CSV file here>.
My grouping column is <cohort / your column name> with the two groups <group A> and <group B>.
1. First check my table: one row per patient; a two-level grouping column; 0/1 binary columns
   for categorical variables; numeric columns for continuous variables. If anything is wrong,
   fix it and tell me what you did.
2. The variable list is configured in DEFAULT_CONFIG or via --config your.json — list the
   variables you detected in my data, ask me which ones to include in the baseline table,
   and put the continuous variables into baseline_continuous_vars.
3. If my data has survival_time and survival_event columns, tell me — the skill will then
   also generate a Cox table.
4. Run the general engine with the skill's own script — do NOT write new analysis code from
   scratch. Show me the resulting clinical_tables.md and convert it to DOCX with Pandoc.
等候 AI agent 运行结束:一张 Markdown 三线表(基线 / 相关性 / Cox / OR)+ 可选的 DOCX。
Step 5|让 AI 解读结果
输入 prompt:
Please explain the tables in my clinical_tables.md line by line:
1. For each variable: which statistical test was used (χ², Fisher exact, or Student t) and
   why — remind me that χ² here does NOT use the Yates continuity correction, so p values
   may differ slightly from SPSS, which is the Table 1 publication convention;
2. Which baseline variables differ significantly between my two cohorts, and what that means
   for interpreting downstream comparisons (potential confounders);
3. If a Cox or OR table was generated: walk me through the effect sizes and confidence
   intervals;
4. Any warnings or things I should pay attention to.
After explaining, tell me how to cite/report these tables in a manuscript.
阅读完 AI 的解释,如果有不懂的直接问它。
进阶|手稿级全套表格 R 管线
如果你要复现一整套论文表格(基线、Firth 惩罚逻辑回归、基因/序列型交叉表、单因素分析……共 10 张),技能内 scripts/pipeline/ 有 9 个 R 脚本 + 1 个 Python 脚本,按序运行即可把结果回填进 Table-all.md 骨架。输入 prompt:
I want to use the ADVANCED R pipeline of the clinical-table skill at D:\claw2bio\clinical-table
to reproduce a full manuscript table suite:
1. Look at examples/input/pipeline/ — two patient-level CSVs plus the Table-all.md skeleton
   live there. First run the pipeline on the EXAMPLE data: run the scripts in scripts/pipeline/
   in order (table1_baseline.R, table2_firth.R, table3_esbl_genes.R, and so on; Table 9 is
   generated by the Python script make_table9_sequencing_quality.py). Each script reads the
   CSVs, computes, fills its section of Table-all.md, and writes a standalone CSV.
2. Use the skill's own scripts unchanged — do NOT write new analysis code from scratch.
   IMPORTANT on Windows: use the English-comment script versions as shipped in the repo;
   if any script is edited, save it as UTF-8 WITHOUT BOM, or R may crash.
3. Verify the run against the anchors in examples/output/pipeline/REPORT.md.
4. After the example works, ask me for my own two-cohort CSVs (prepared with the same column
   structure) and repeat the pipeline on them.
技能页有全套 10 张表的真实产出图(Table 1–10,每个数字均与作者独立复核脚本逐格对账过),可对照参考:/zh/skills/clinical-table
更多分析
下面两个技能与本技能相关,安装方式完全相同(一键 prompt 或网站下载 zip 包):
生存分析曲线 —— survival-curve
一句话:随访表进,KM 生存曲线 + 风险表 + Cox 森林图出。 如果你的患者数据里有随访时间和结局事件,基线表之外通常还要配一张 KM 曲线。
详细介绍与下载:/zh/skills/survival-curve
分组柱状图 —— barplot
一句话:任何 2–6 组的实验数据一键出带统计标注的柱状图。 临床数据之外的实验数据(ELISA、WB 灰度……)用它。
详细介绍与下载:/zh/skills/barplot