
Zero-Basics — Single-Cell Pseudotime Analysis with an AI Agent (scRNA-seq-pseudotime) | Copy & Paste All the Way
This tutorial uses workbuddy as the AI agent and Hy3 as the AI API. For installing and configuring the AI agent itself, see the AI Agent setup tutorial.
Before you start (must read):
- If this is your first time doing bioinformatics with an AI agent, we strongly recommend following the bulk-RNA-seq differential analysis tutorial first, to learn the full "install skill → set up environment → run example → switch to your own data" workflow, then come back to this skill.
- ⚠️ Hardware requirement (applies to ALL single-cell skills): use a PC with ≥16 GB RAM and a multi-core CPU. The memory peaks of this skill are the learn_graph and graph_test steps.
- This skill is a downstream skill of the scRNA-seq standard pipeline: it consumes the
annotated_seurat.rdsproduced by that pipeline (it does NOT do QC / clustering itself). Please finish the scRNA-seq standard pipeline first. - In one sentence: reusing the existing UMAP embedding and cluster IDs, monocle3 learns a trajectory graph, orders cells by pseudotime from a starting point YOU specify, and graph_test finds pseudotime-associated genes.
- Choosing the root is a biological decision: the skill refuses to run without a root — it first prints a cluster → cell-type table to help you choose, but the choice is yours.
Tutorial structure:
- Step 1 | Install the scRNA-seq-pseudotime skill (one time only)
- Step 2 | Set up the runtime environment (one time only)
- Step 3 | Run the bundled example data
- Step 4 | Switch to your own data
- Step 5 | Read the REPORT.md
- More analysis | Related skills (standard pipeline / virtual knockout)
Step 1 | Install the scRNA-seq-pseudotime skill
Paste this prompt:
Please install the "scRNA-seq-pseudotime" skill for me, into the D:\claw2bio folder:
1. Create a folder named claw2bio in the root of the D: drive (if it doesn't exist yet).
2. From the GitHub repository https://github.com/nihuanhe/claw2bio, fetch ONLY the folder
   bioinformatics/sc_RNA_seq/scRNA-seq-pseudotime (use sparse checkout — do NOT clone the
   whole repository), and place it at D:\claw2bio\scRNA-seq-pseudotime.
3. If downloading from GitHub fails or is too slow, download the zip from this mirror link instead:
   https://claw2bio.site/downloads/scRNA-seq-pseudotime.zip
   and extract it to D:\claw2bio\scRNA-seq-pseudotime.
4. Read the SKILL.md inside, then confirm to me that the skill is ready and list the contents
   of the folder.
(If my PC has no D: drive, install to C:\claw2bio instead and tell me the actual path.)
When Step 1 finishes, open the file manager and confirm that D:\claw2bio\scRNA-seq-pseudotime exists, with scripts/, examples/, SKILL.md, etc. inside.
Step 2 | Set up the runtime environment
If you already installed R (≥4.5) + the Seurat environment while following the scRNA-seq tutorial, this step mainly adds monocle3. Paste this prompt:
Please set up the runtime environment for the "scRNA-seq-pseudotime" skill at
D:\claw2bio\scRNA-seq-pseudotime:
1. R should already be installed from the scRNA-seq tutorial — verify that R (4.5 or above)
   and the Seurat environment are installed; report versions to me. If anything is missing,
   stop and tell me.
2. Install the additional R packages this skill needs (monocle3 and its dependencies): try
   CRAN / Bioconductor online first; if any package fails or is too slow, stop and tell me
   about it. Also make sure Python has pandas / numpy / scipy available.
3. When everything is installed, confirm to me that the skill can run, and remind me of my
   RAM size and CPU core count (single-cell work needs ≥16 GB RAM and a multi-core CPU).
Step 3 | Run the bundled example data
First run WITHOUT a root: the skill will print a cluster → cell-type table and exit by design, to help you choose the starting point. Paste this prompt:
The skill is installed at D:\claw2bio\scRNA-seq-pseudotime. Please run the bundled example:
1. Find the example annotated_seurat.rds in the skill's examples/ folder.
2. FIRST run the pipeline WITHOUT any root option — the skill will print a cluster → cell-type
   label table and exit by design. Show me that table.
3. Then ask ME which cluster or cell type to use as the trajectory root — do NOT pick one
   yourself; the root is a biological decision.
4. After I tell you the root, run the full pipeline: python scripts/run_pseudotime.py
   <annotated_seurat.rds> <output_dir> --root-cluster <the cluster I chose>
   (or --root-label "<the label I chose>").
5. Prefer the skill's own scripts in scripts/ — do NOT write new analysis code from scratch.
6. When the run succeeds, show me the trajectory colored by pseudotime, the trajectory colored
   by cluster, and the top-4 pseudotime-gene trend plots; then explain the REPORT.md line
   by line.
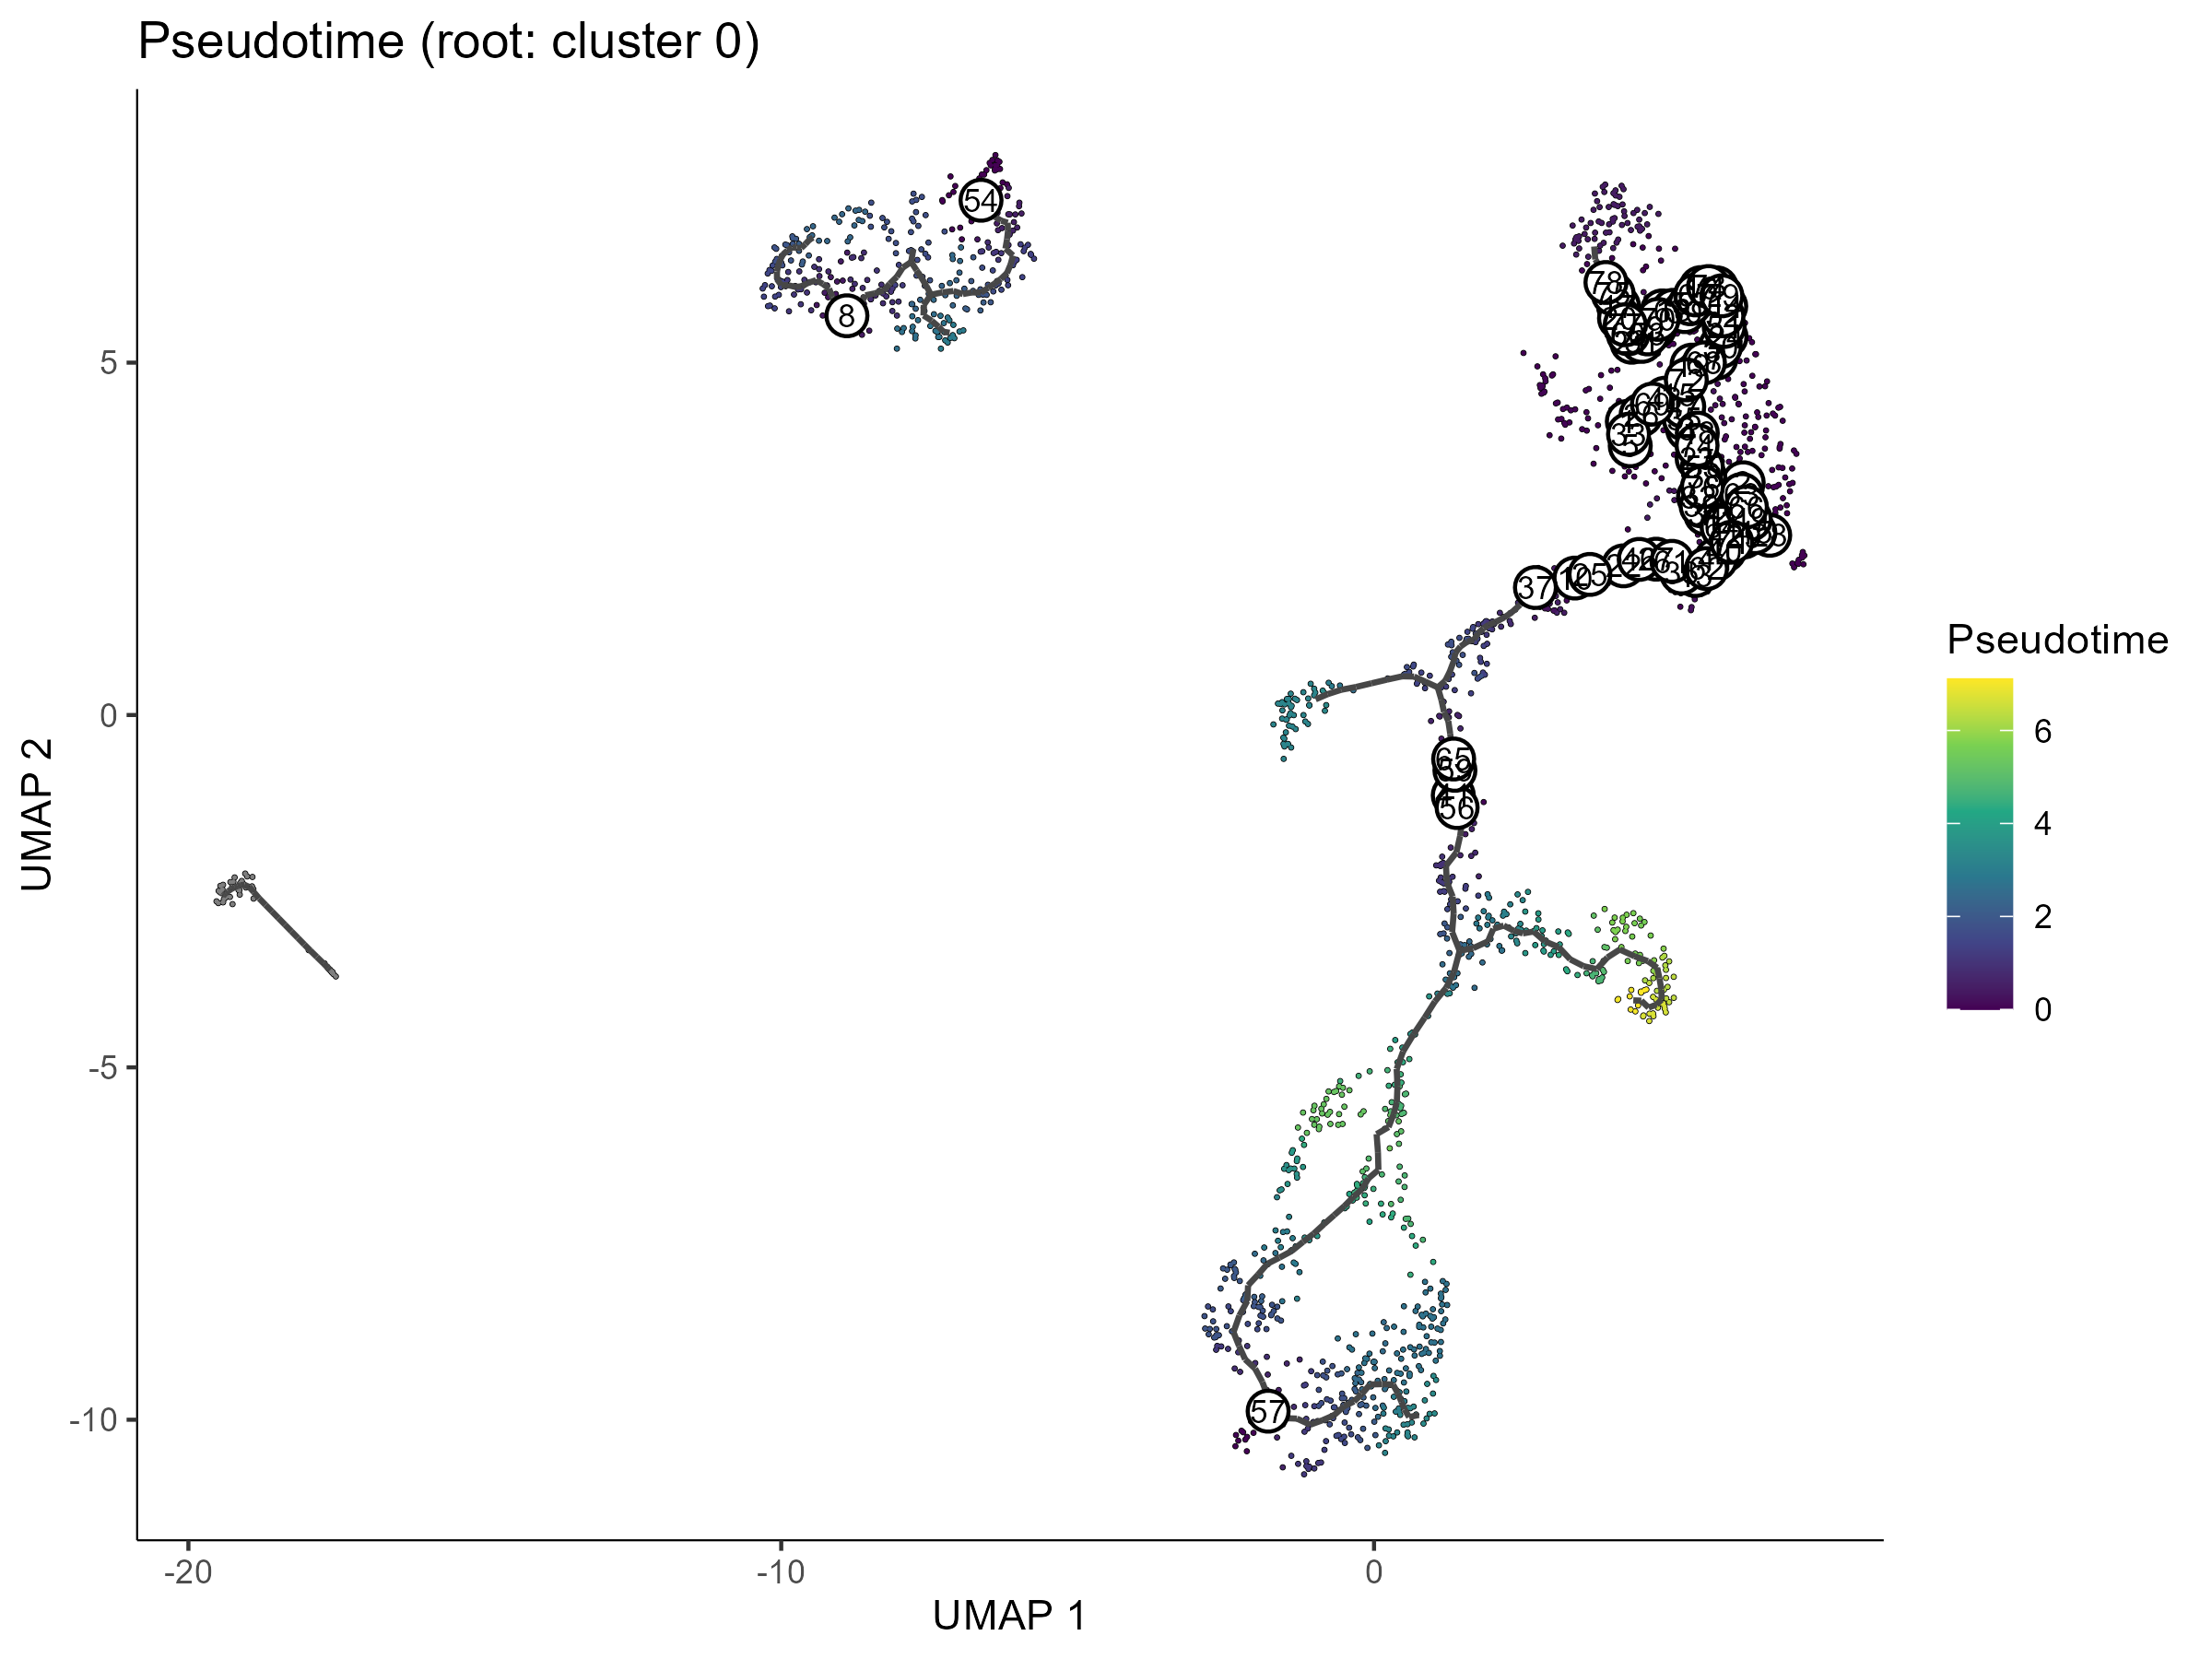
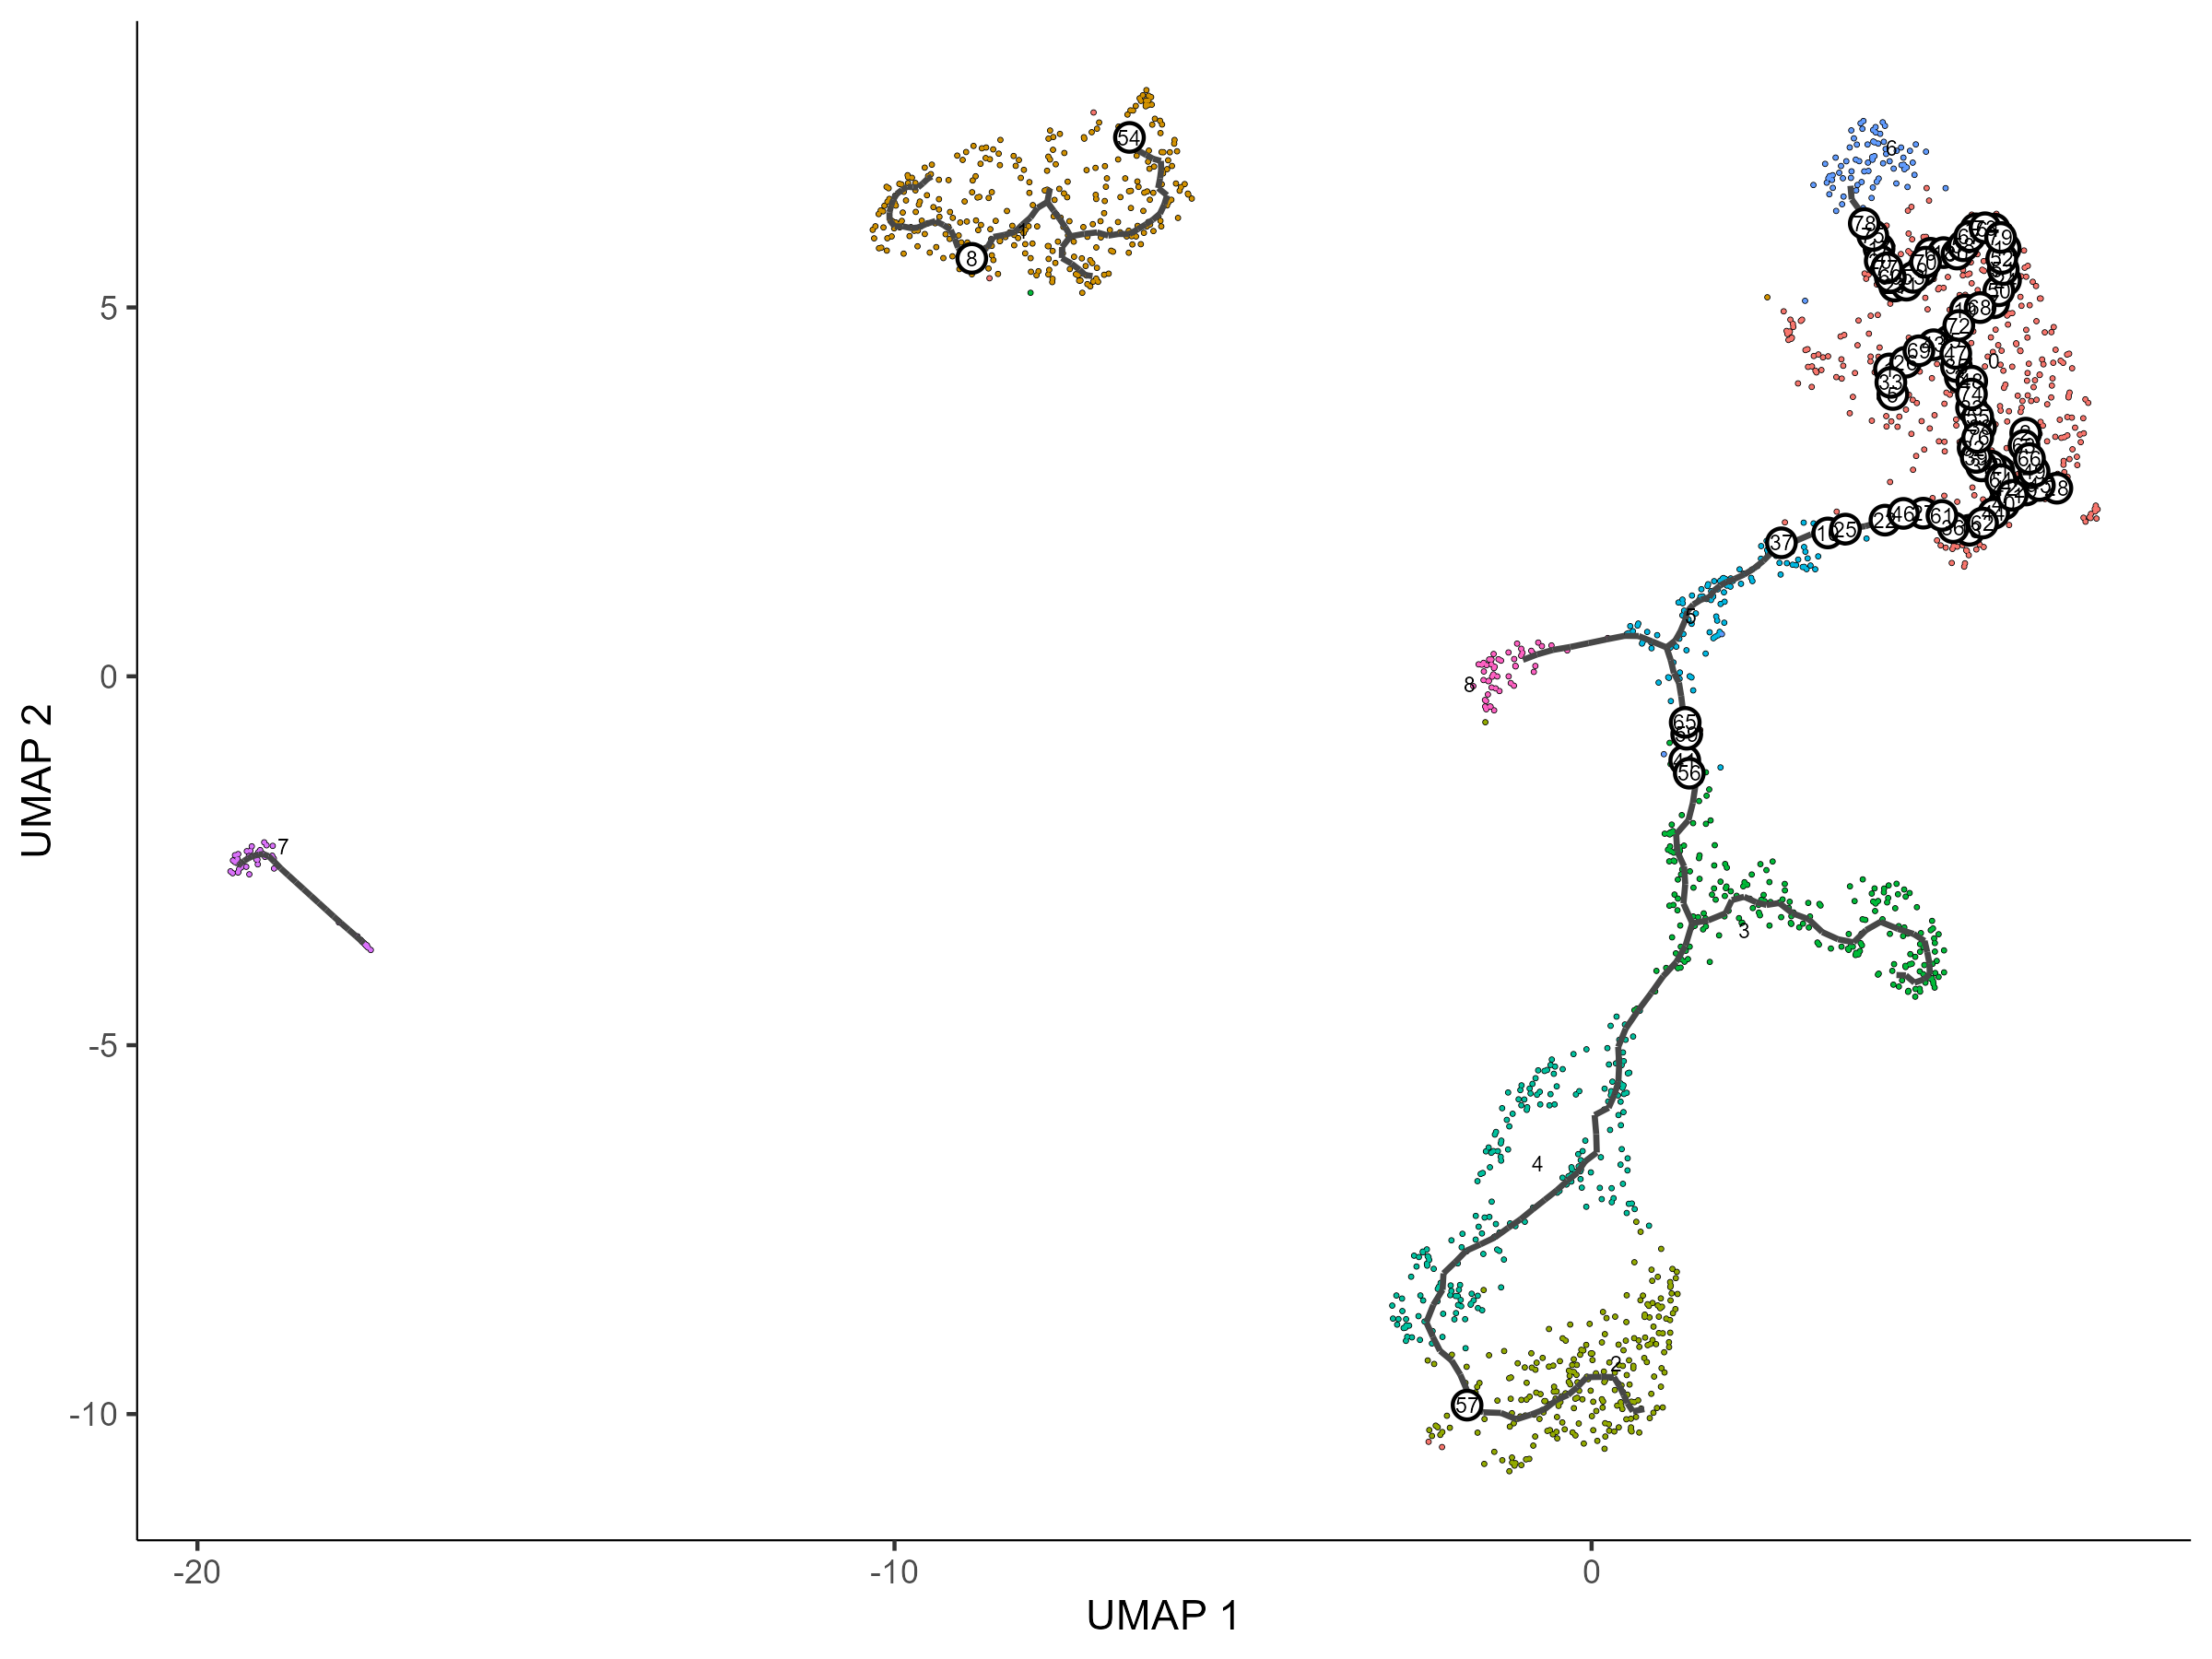
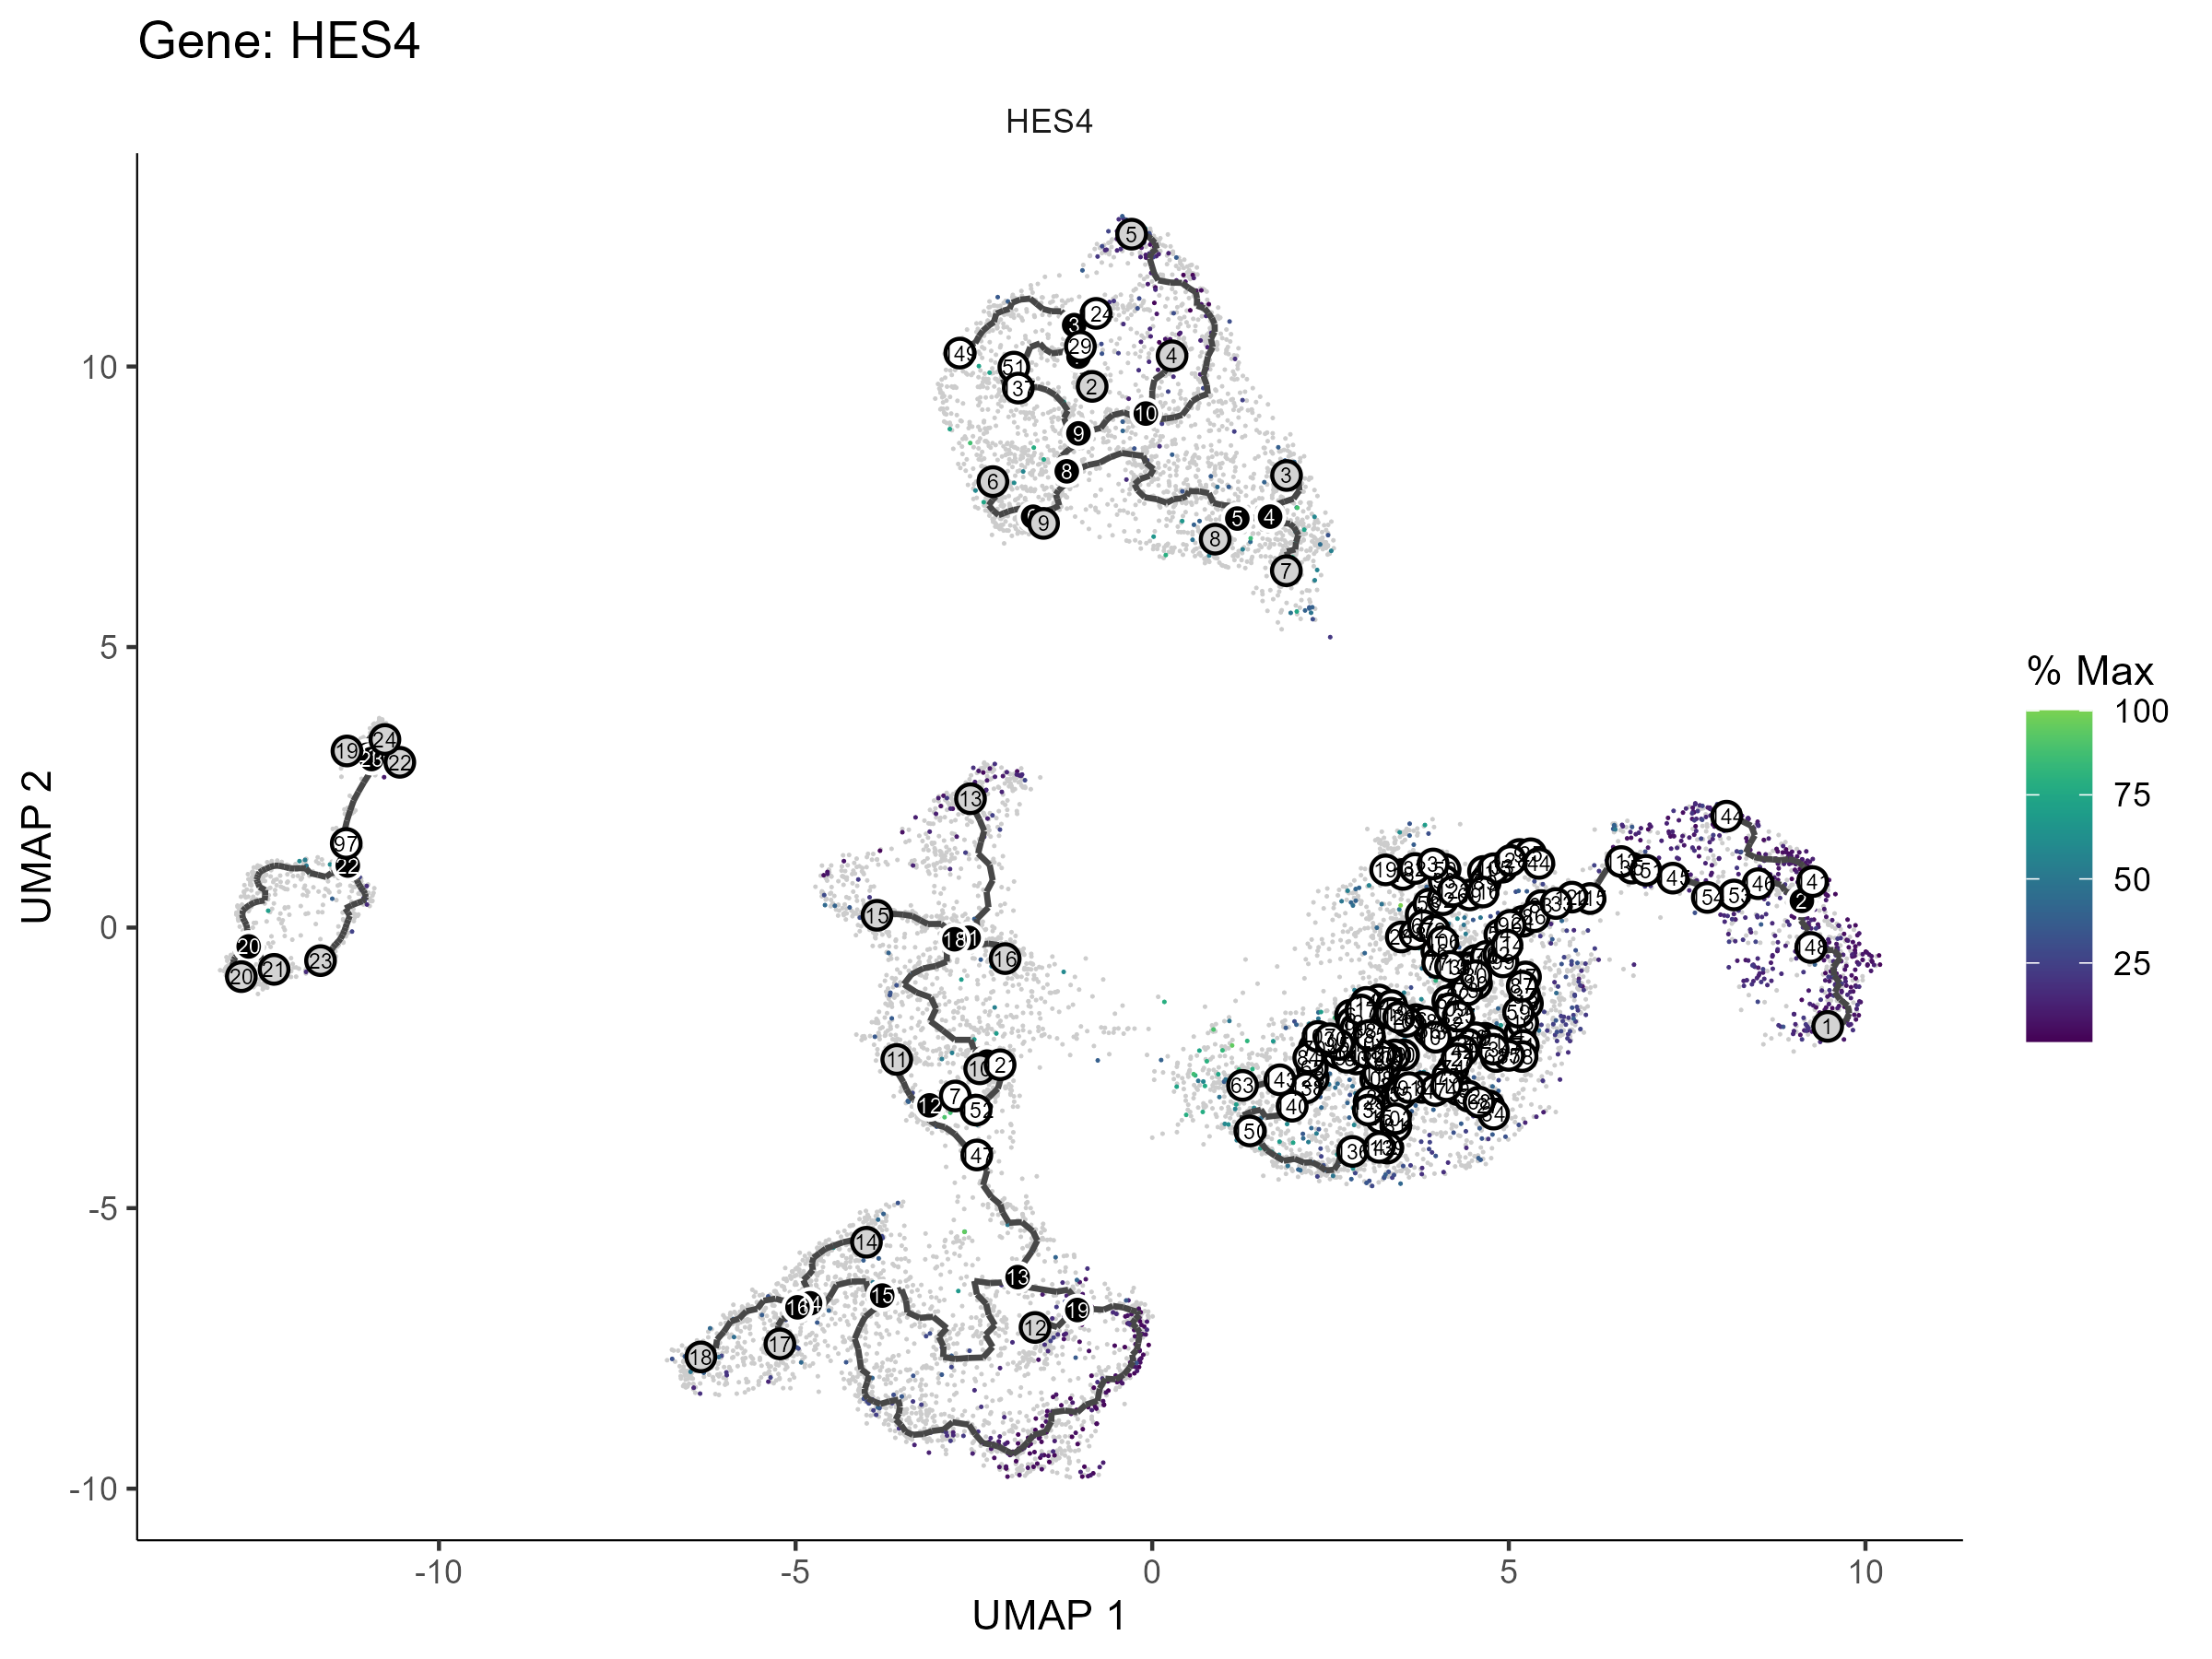
When the run succeeds, you should see three kinds of figures (examples below; replace with your own screenshots later). Anchor from the real example: full GSE234527 with 10,859 cells, root = cluster 0, ~11 minutes total, 13,790 pseudotime-associated genes (q < 0.05):
Trajectory colored by pseudotime — warmer colors = farther from the root:
The same trajectory colored by cluster, for checking the trajectory direction against cell types:
Expression trends of top graph_test genes along the trajectory (one plot per top-4 gene):
Step 4 | Switch to your own data
Hand over your own annotated_seurat.rds from the standard pipeline. Paste this prompt:
My own annotated Seurat object is at: <paste the path to your annotated_seurat.rds here —
it must come from the scRNA-seq standard pipeline and contain seurat_clusters, the UMAP
reduction, and cell_type_final>.
1. FIRST run the skill WITHOUT any root option to print the cluster → cell-type label table
   (you can also consult annotation_per_cluster.csv from the main pipeline). Show me the
   table and ask ME to choose the root — do NOT pick one yourself.
2. <Optional: I only want the trajectory within these cell types: <labels> — use
   --subset-labels.>
3. After I tell you the root, run the full pipeline with the skill's own scripts — do NOT
   write new analysis code from scratch.
4. Memory management: learn_graph and graph_test are the memory peaks. The skill writes
   .checkpoint_cds_learned.rds after learn_graph — if the run crashes, re-run WITH --resume
   to reuse the checkpoint instead of starting over. If graph_test is too slow or too heavy,
   ask me whether to add --no-graph-test (trajectory only) or narrow the cell range with
   --subset-labels.
5. When the run succeeds, show me the trajectory figures and the top-gene trend plots, and
   explain the REPORT.md line by line.
Wait for the AI agent to finish: pseudotime_cds.rds (monocle3 object with pseudotime) + a set of trajectory figures + pseudotime_genes.csv (full graph_test table; q < 0.05 is significant) + top-4 gene trend plots.
Step 5 | Read the REPORT.md
Paste this prompt:
Please explain the REPORT.md in my pseudotime results folder line by line:
1. What each output file is and what it contains (pseudotime_cds.rds, the trajectory figures,
   pseudotime_genes.csv, the top-gene trend plots);
2. Walk me through MY trajectory: does the pseudotime direction match the known biology of my
   cell types (e.g., from progenitor-like to differentiated)? If it looks reversed, explain
   that the root choice determines the direction;
3. Among the significant pseudotime-associated genes (q < 0.05), point out the top 10 most
   interesting ones and what they may suggest biologically;
4. Any warnings or things I should pay attention to.
After explaining, tell me which figures and tables can be used directly in a paper or
presentation.
After reading the AI's explanation, if anything is unclear, just ask it directly.
More analysis
The two skills below are companions of this one, installed in exactly the same way (one-click prompt or zip download). Both also require ≥16 GB RAM + a multi-core CPU:
scRNA-seq standard pipeline — scRNA-seq
One sentence: raw matrices in (any format), an annotated Seurat object out. If you don't have an annotated_seurat.rds yet, do this first.
Details & download: /skills/scRNA-seq
scRNA-seq virtual knockout — scRNA-seq-virtual-ko
One sentence: pick a gene, "knock it out" in silico with scTenifoldKnk, and see how the regulatory network changes. The key genes you find in pseudotime can be tested with a virtual knockout to predict their regulatory roles (computational predictions; experimental validation required).
Details & download: /skills/scRNA-seq-virtual-ko