
Zero-Basics — scRNA-seq Standard Pipeline with an AI Agent | Copy & Paste All the Way
This tutorial uses workbuddy as the AI agent and Hy3 as the AI API. For installing and configuring the AI agent itself, see the AI Agent setup tutorial.
Before you start (must read):
- If this is your first time doing bioinformatics with an AI agent, we strongly recommend following the bulk-RNA-seq differential analysis tutorial first, to learn the full "install skill → set up environment → run example → switch to your own data" workflow, then come back to this skill.
- ⚠️ Hardware requirement (applies to ALL single-cell skills): use a PC with ≥16 GB RAM and a multi-core CPU. Official benchmarks: a ~58k-cell dataset peaked at ~5.7 GB RAM; a ~97k-cell dataset peaked at ~11.9 GB — already the limit of a 16 GB machine. For larger data, run a downsampled exploration pass first, or use a machine with more RAM.
- In one sentence: raw matrices in (any format), an annotated Seurat object out — QC, Harmony multi-sample integration, clustering, UMAP, markers, and SingleR annotation in one pipeline; 10X mtx / h5 / h5ad / rds / text matrices / BGI are auto-detected, and stage 00.5 auto-fixes 9 classes of format pitfalls; every stage saves a checkpoint for resuming.
- This pipeline stops at automatic annotation — pseudotime and virtual knockout are separate skills that both consume this pipeline's
annotated_seurat.rds(see "More analysis" at the end).
Tutorial structure:
- Step 1 | Install the scRNA-seq skill (one time only)
- Step 2 | Set up the runtime environment (one time only)
- Step 3 | Run the bundled example data
- Step 4 | Switch to your own data
- Step 5 | Read the REPORT.md
- More analysis | Downstream skills (pseudotime / virtual knockout)
Step 1 | Install the scRNA-seq skill
Note: this skill package is large (~102 MB), and the example data is a separate zip (~102 MB), independent from the skill package. Paste this prompt:
Please install the "scRNA-seq" skill for me, into the D:\claw2bio folder:
1. Create a folder named claw2bio in the root of the D: drive (if it doesn't exist yet).
2. From the GitHub repository https://github.com/nihuanhe/claw2bio, fetch ONLY the folder
   bioinformatics/sc_RNA_seq/scRNA-seq (use sparse checkout — do NOT clone the whole
   repository), and place it at D:\claw2bio\scRNA-seq.
3. If downloading from GitHub fails or is too slow, download the skill zip from this mirror
   link instead:
   https://my-website-1358159656.cos.ap-guangzhou.myqcloud.com/scRNA-seq/zip/scRNA-seq.zip
   and extract it to D:\claw2bio\scRNA-seq. The example data is a SEPARATE zip:
   https://my-website-1358159656.cos.ap-guangzhou.myqcloud.com/scRNA-seq/data/scRNA-seq-examples.zip
   — download it too and merge its contents into the examples/ folder of the skill.
4. Read the SKILL.md inside, then confirm to me that the skill is ready and list the contents
   of the folder (including whether examples/ has input data).
(If my PC has no D: drive, install to C:\claw2bio instead and tell me the actual path.)
When Step 1 finishes, open the file manager and confirm that D:\claw2bio\scRNA-seq exists, with scripts/, examples/, SKILL.md, etc. inside.
Step 2 | Set up the runtime environment
This skill uses BOTH R (≥4.5, with Seurat / harmony / SingleR) and Python (pandas / numpy / scipy). If you already installed R while following the bulk-RNA-seq tutorial, this step mainly adds the big Seurat-family packages (the first install may take 20–60 minutes — be patient). Paste this prompt:
Please set up the runtime environment for the "scRNA-seq" skill at D:\claw2bio\scRNA-seq:
1. R should already be installed from the bulk-RNA-seq tutorial — verify that R is installed
   and report its version to me (it must be 4.5 or above). If R is missing, stop and tell me.
2. Also check for a Python installation; if Python is NOT installed, install a recent Python 3
   from python.org (check "Add python.exe to PATH"), then pip install pandas numpy scipy.
3. Install all R packages this skill needs (Seurat, harmony, SingleR and their dependencies):
   try CRAN / Bioconductor online first; if any package fails or is too slow, stop and tell
   me about it. These packages are LARGE — the first install may take 20–60 minutes, which
   is normal.
4. The skill's stage 00 checks dependencies automatically and supports an --install-deps flag.
   When everything is installed, run the dependency check and show me the result.
5. Reminder: this machine should have at least 16 GB RAM and a multi-core CPU for single-cell
   work — tell me my RAM size and CPU core count, and warn me if they are below that.
Step 3 | Run the bundled example data
Paste this prompt:
The skill is installed at D:\claw2bio\scRNA-seq. Please run the bundled example
(downsampled GSE234527, 5 samples × 400 cells, 10X mtx format):
1. Example input is at D:\claw2bio\scRNA-seq\examples\1_example_GSE234527_downsampled-10x-mtx\input\
2. Write results to D:\claw2bio\scRNA-seq\examples\1_example_GSE234527_downsampled-10x-mtx\output\
   with the metadata file at ...\input\sample_metadata.csv, and use --overwrite.
3. Prefer the skill's own scripts in scripts/ — do NOT write new analysis code from scratch.
4. When the run succeeds, show me the key result figures in this order: the QC violin plot
   (after QC), the UMAP colored by cell-type annotation, the UMAP colored by sample group,
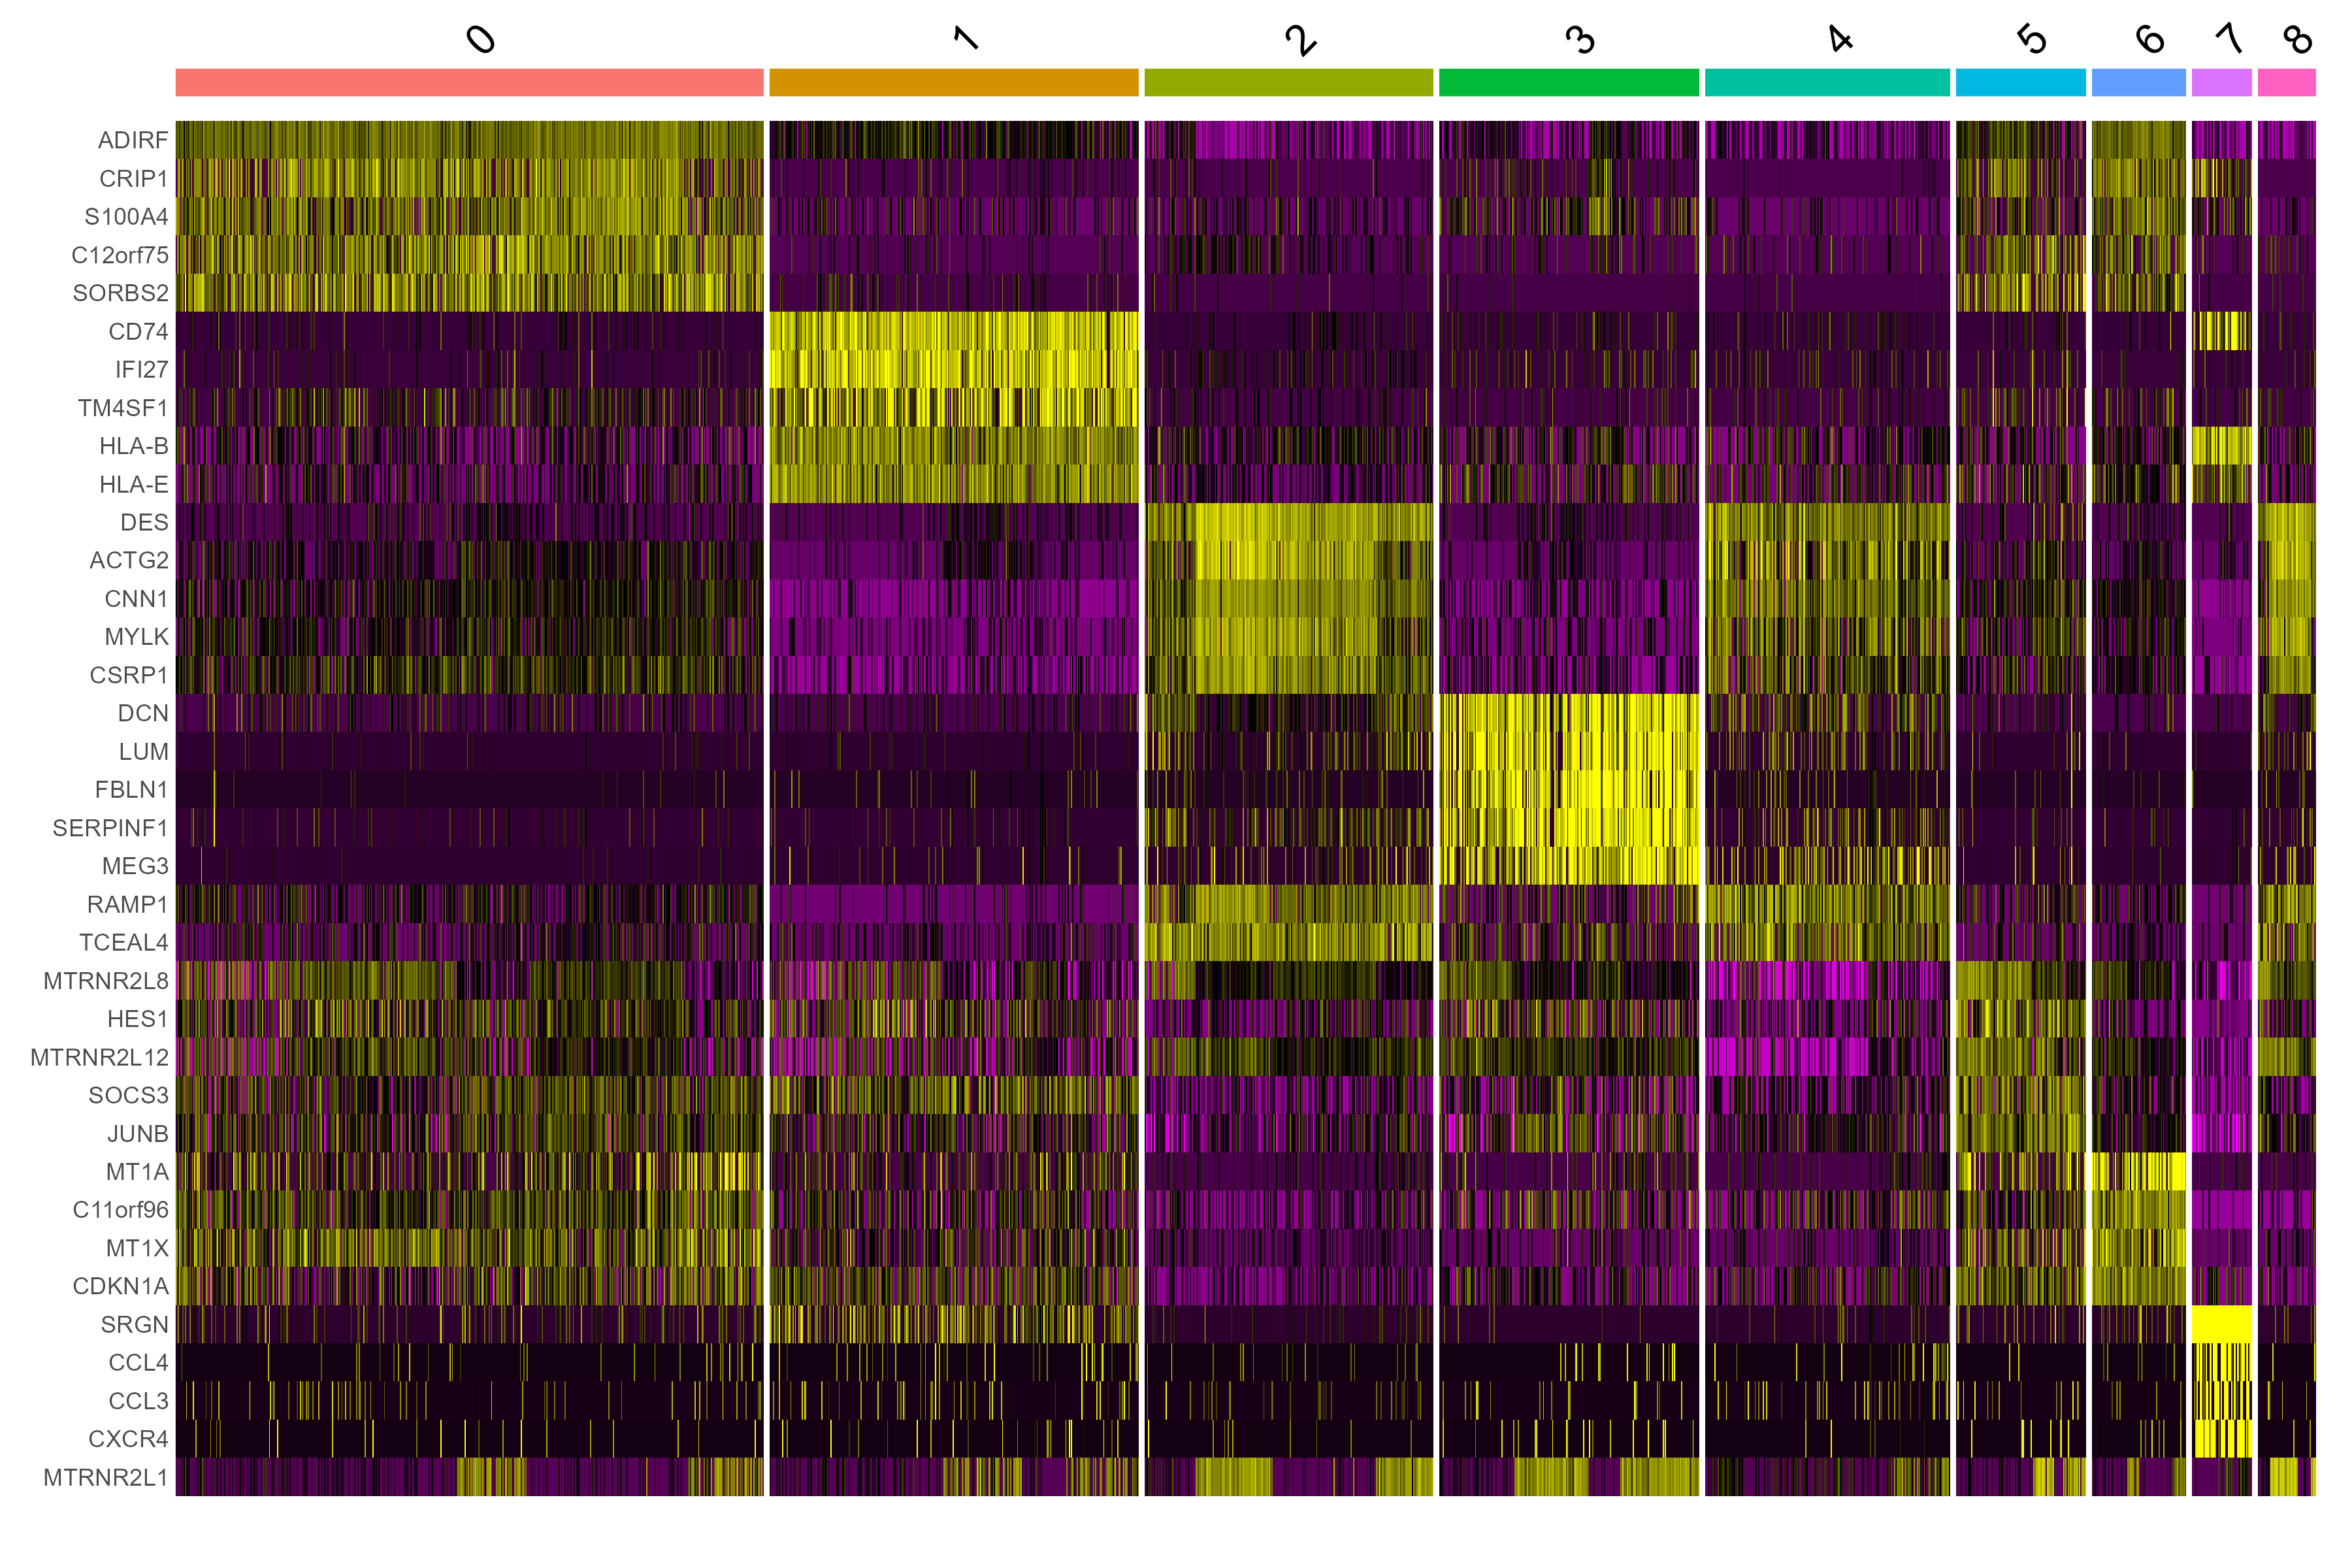
   and the marker dotplot + heatmap; then explain the generated REPORT.md line by line.
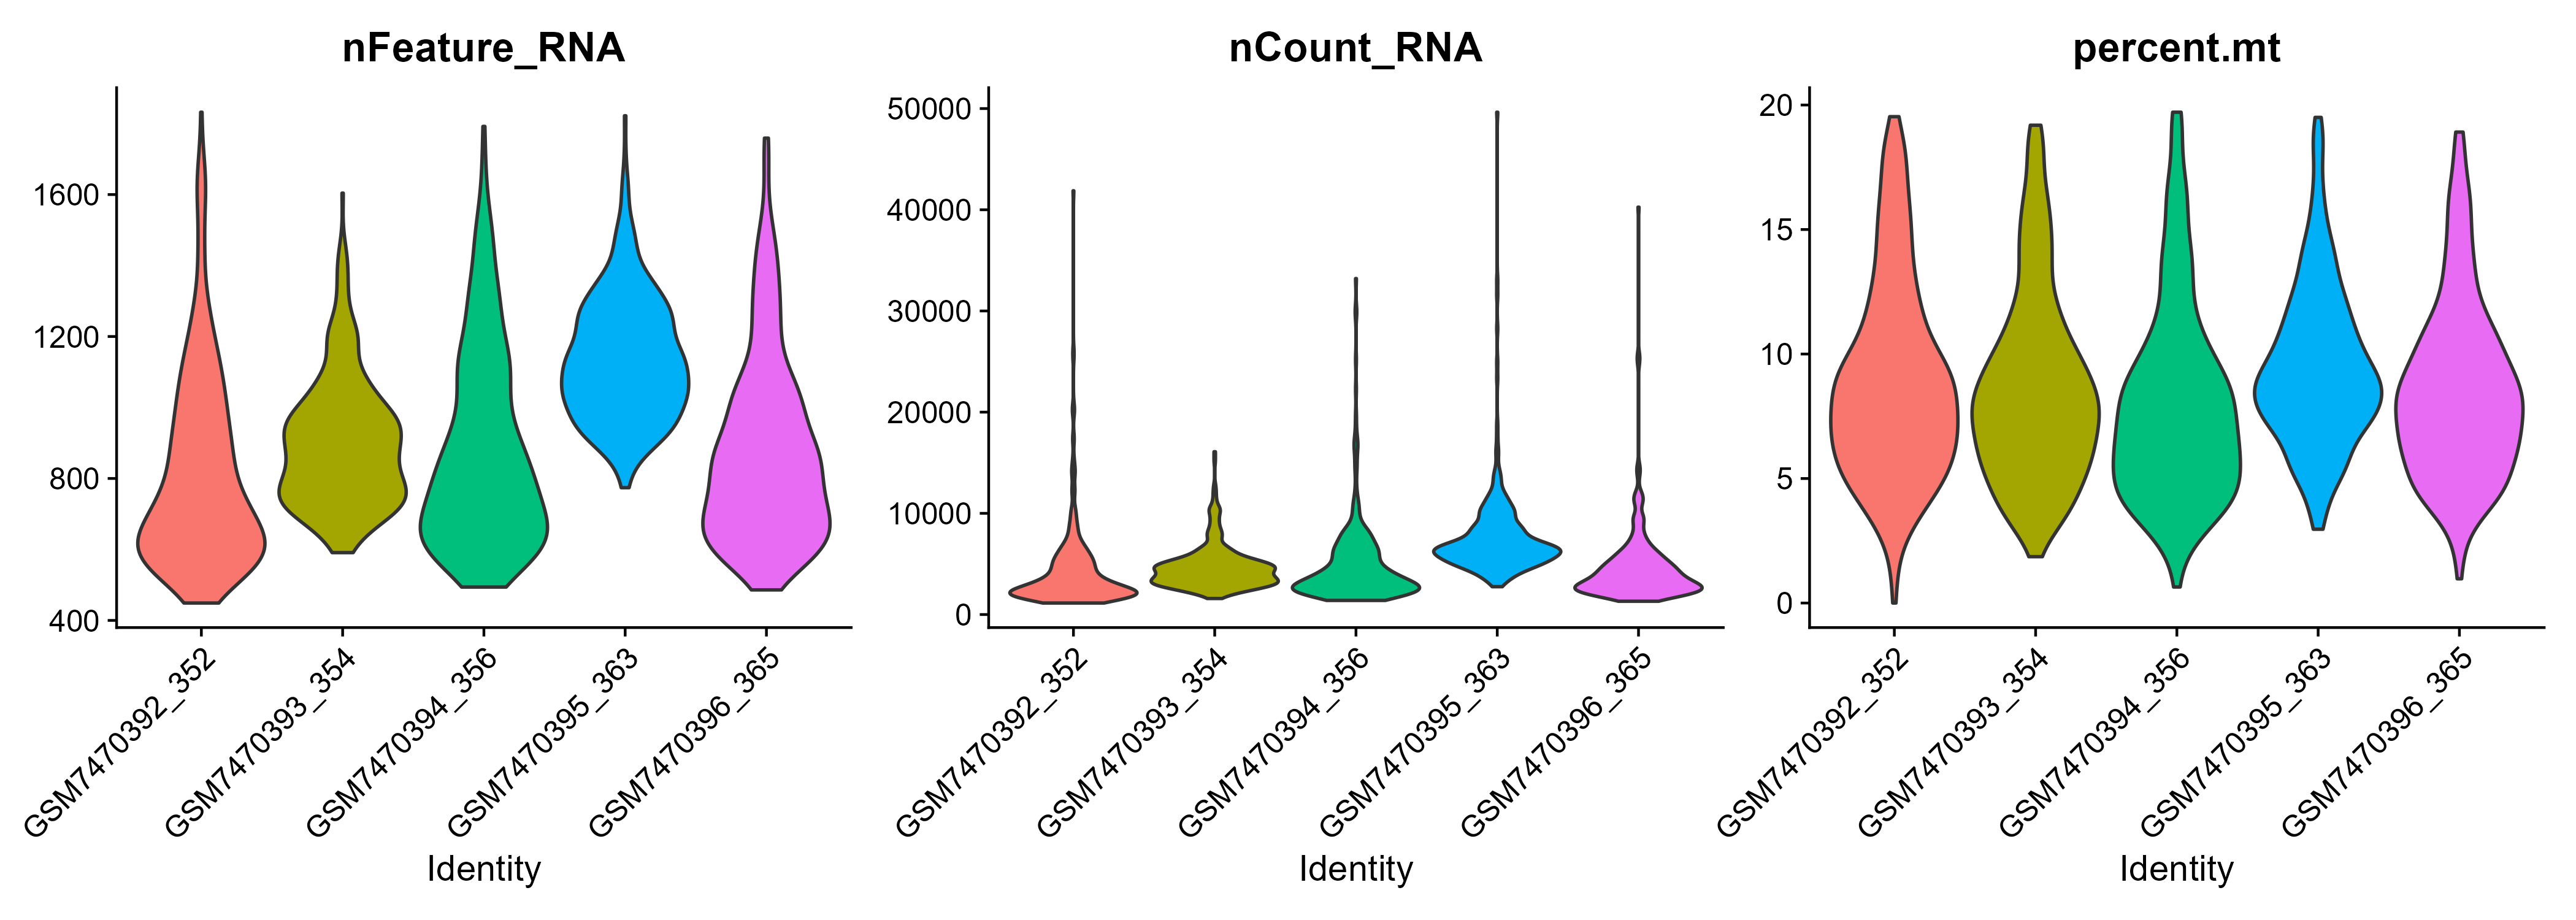
Anchor results for a successful run: ~1820 cells retained after QC (per-sample retention 93.8%–98.2%), clustered into 9 clusters. If your results match, the environment and pipeline are working. Example figures (replace with your own screenshots later):
Per-sample nFeature / nCount / percent.mt distributions after QC:
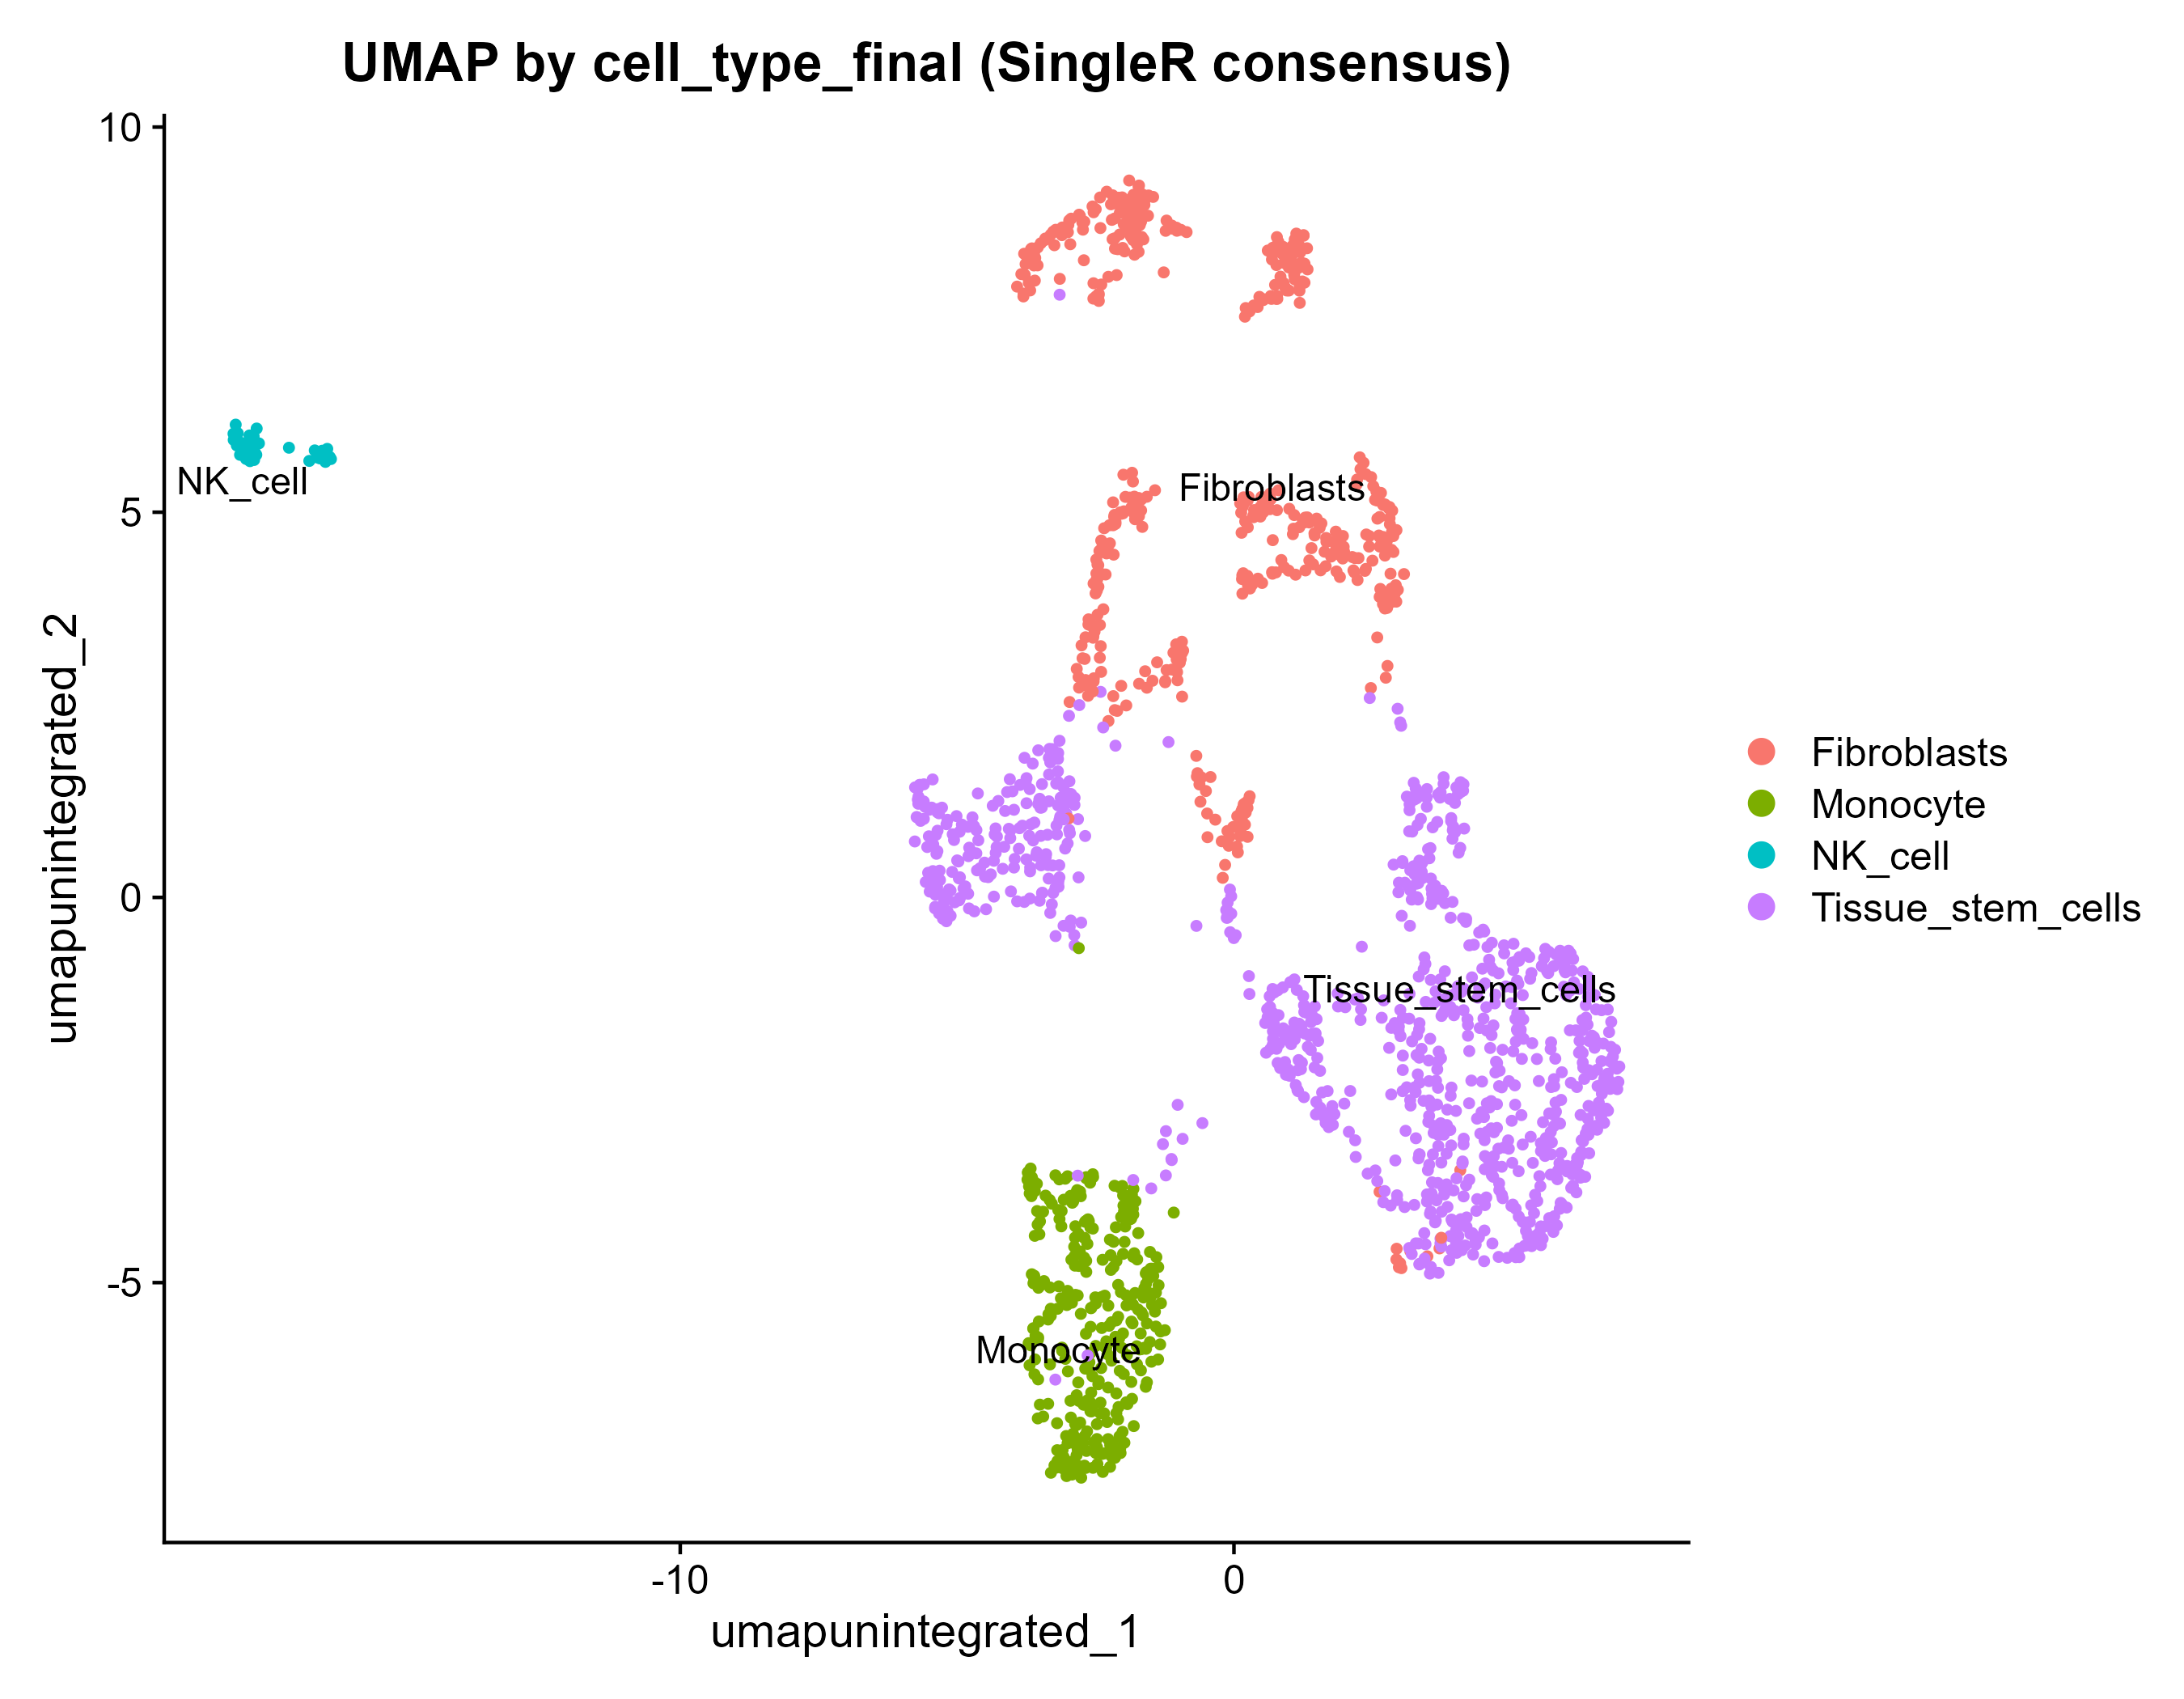
UMAP colored by cell-type annotation (SingleR automatic annotation):
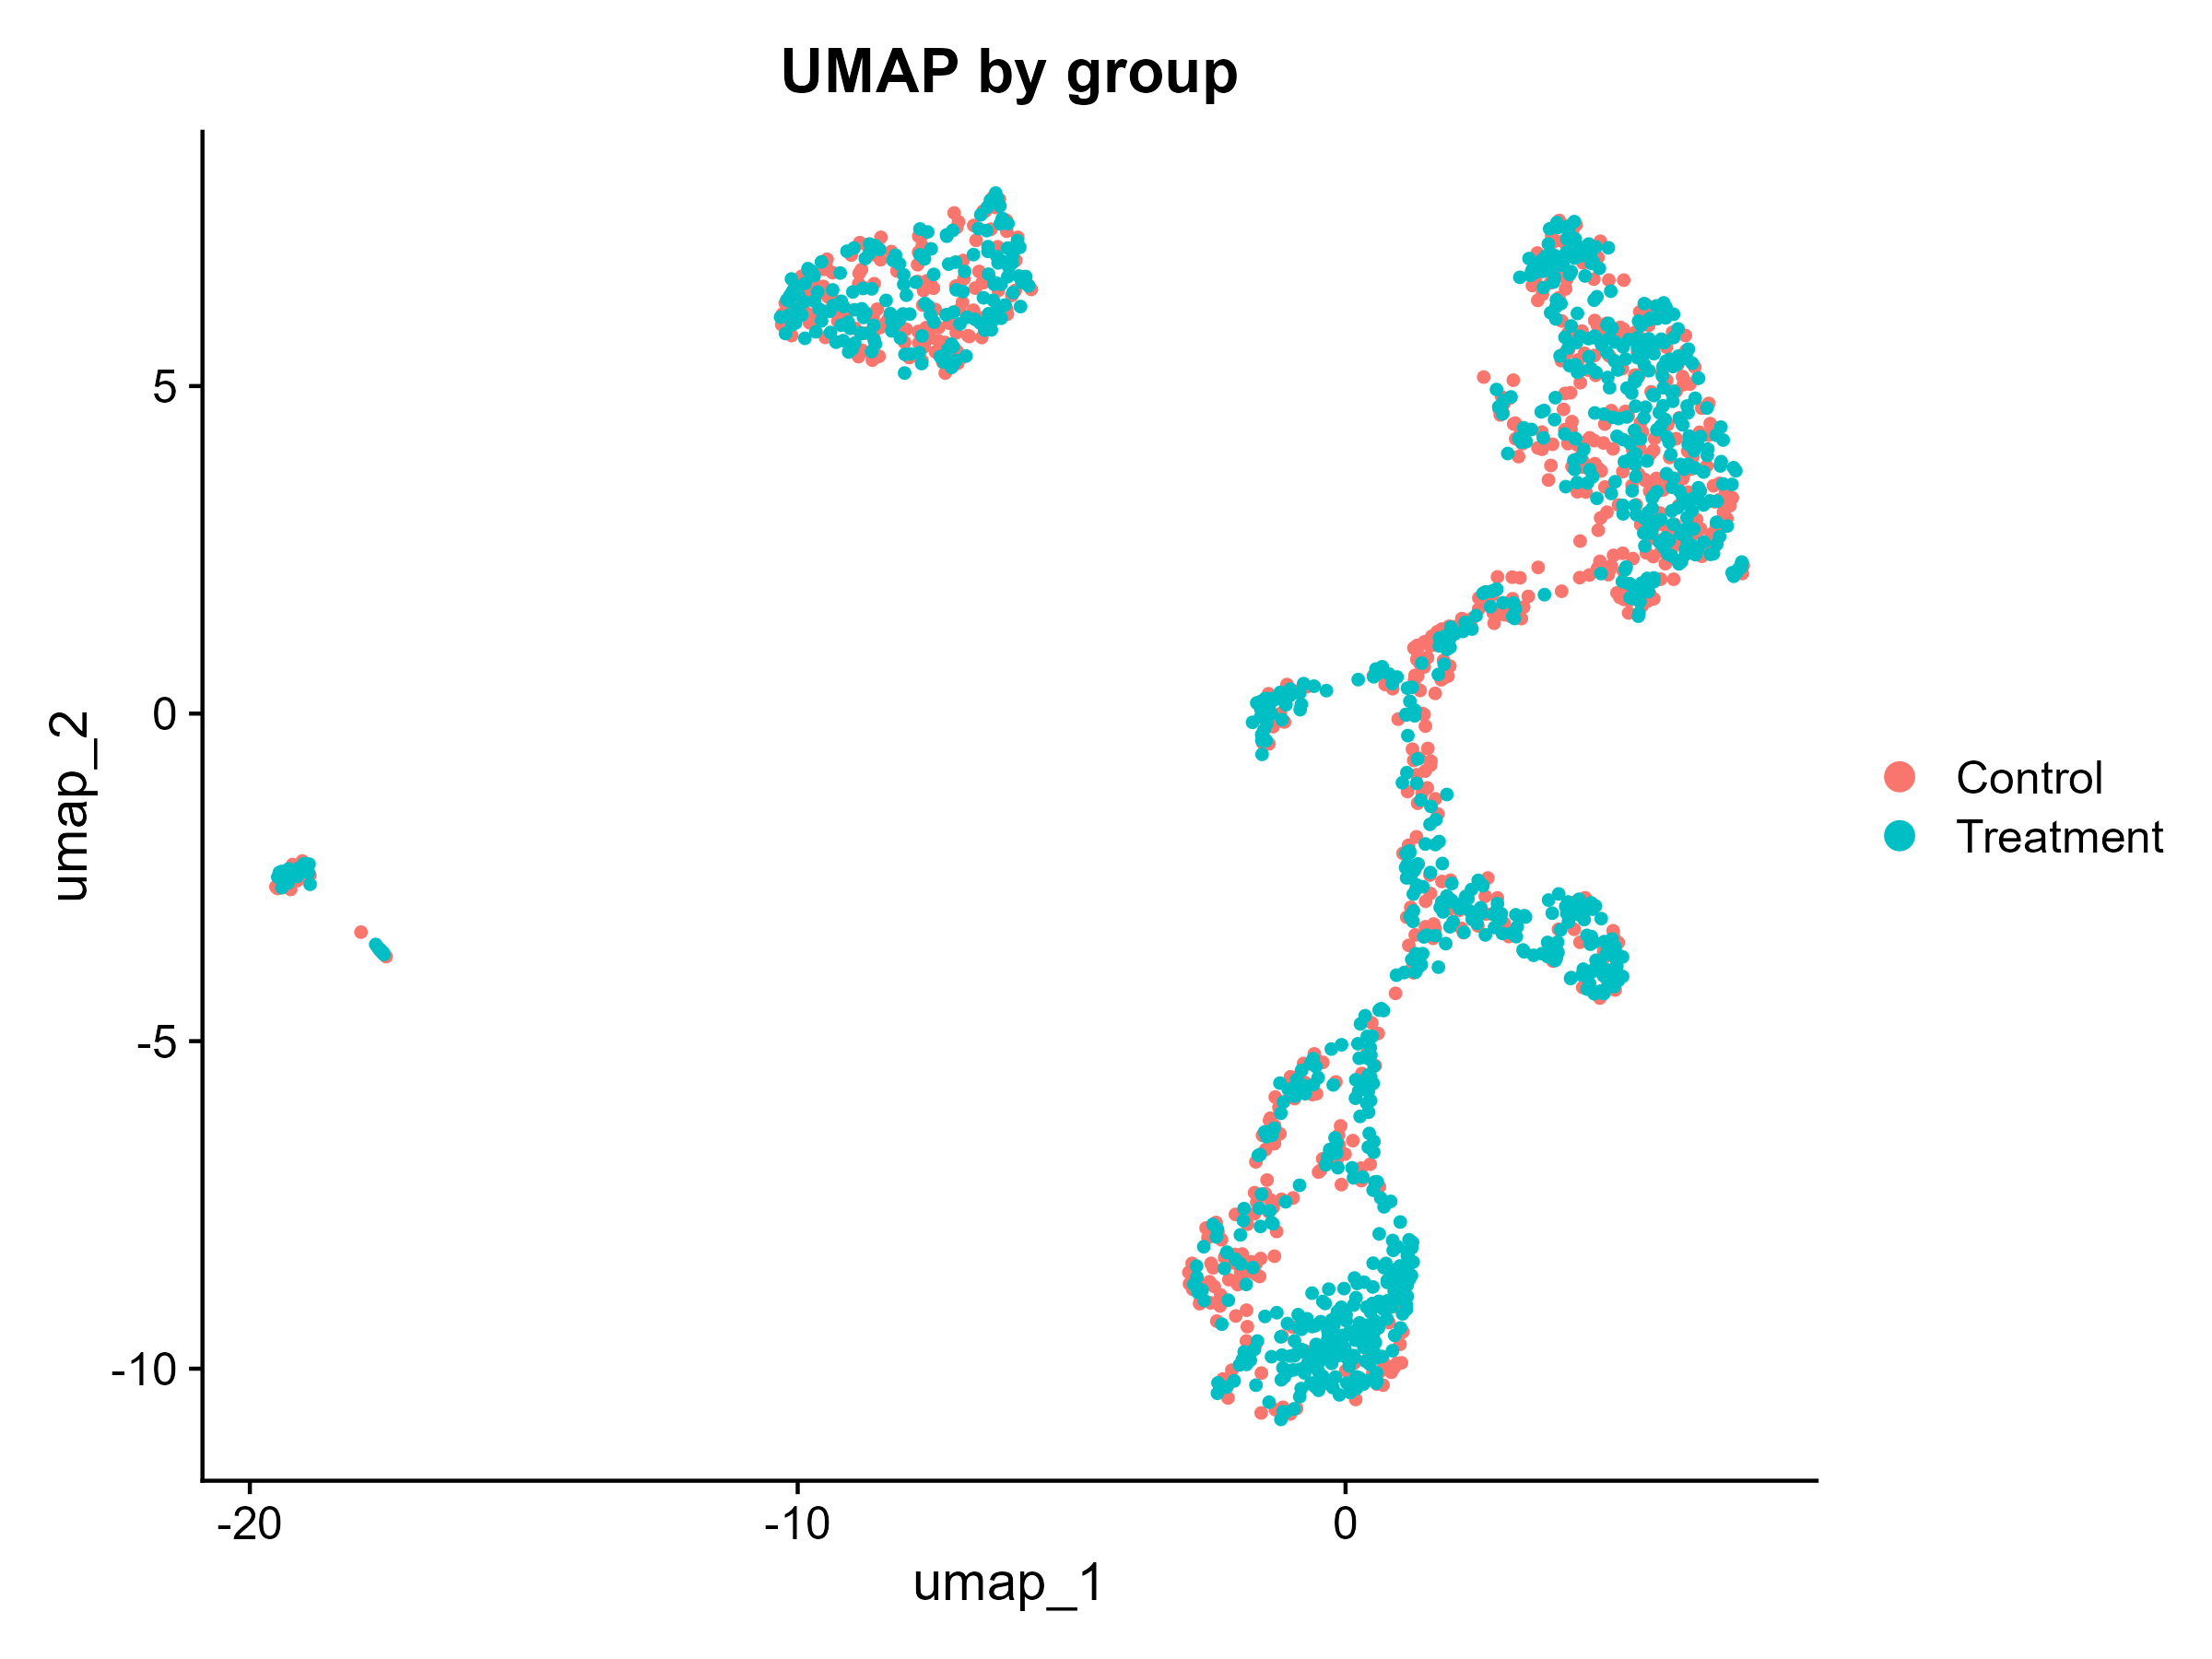
UMAP colored by sample group (for checking group distribution and batch confounding):
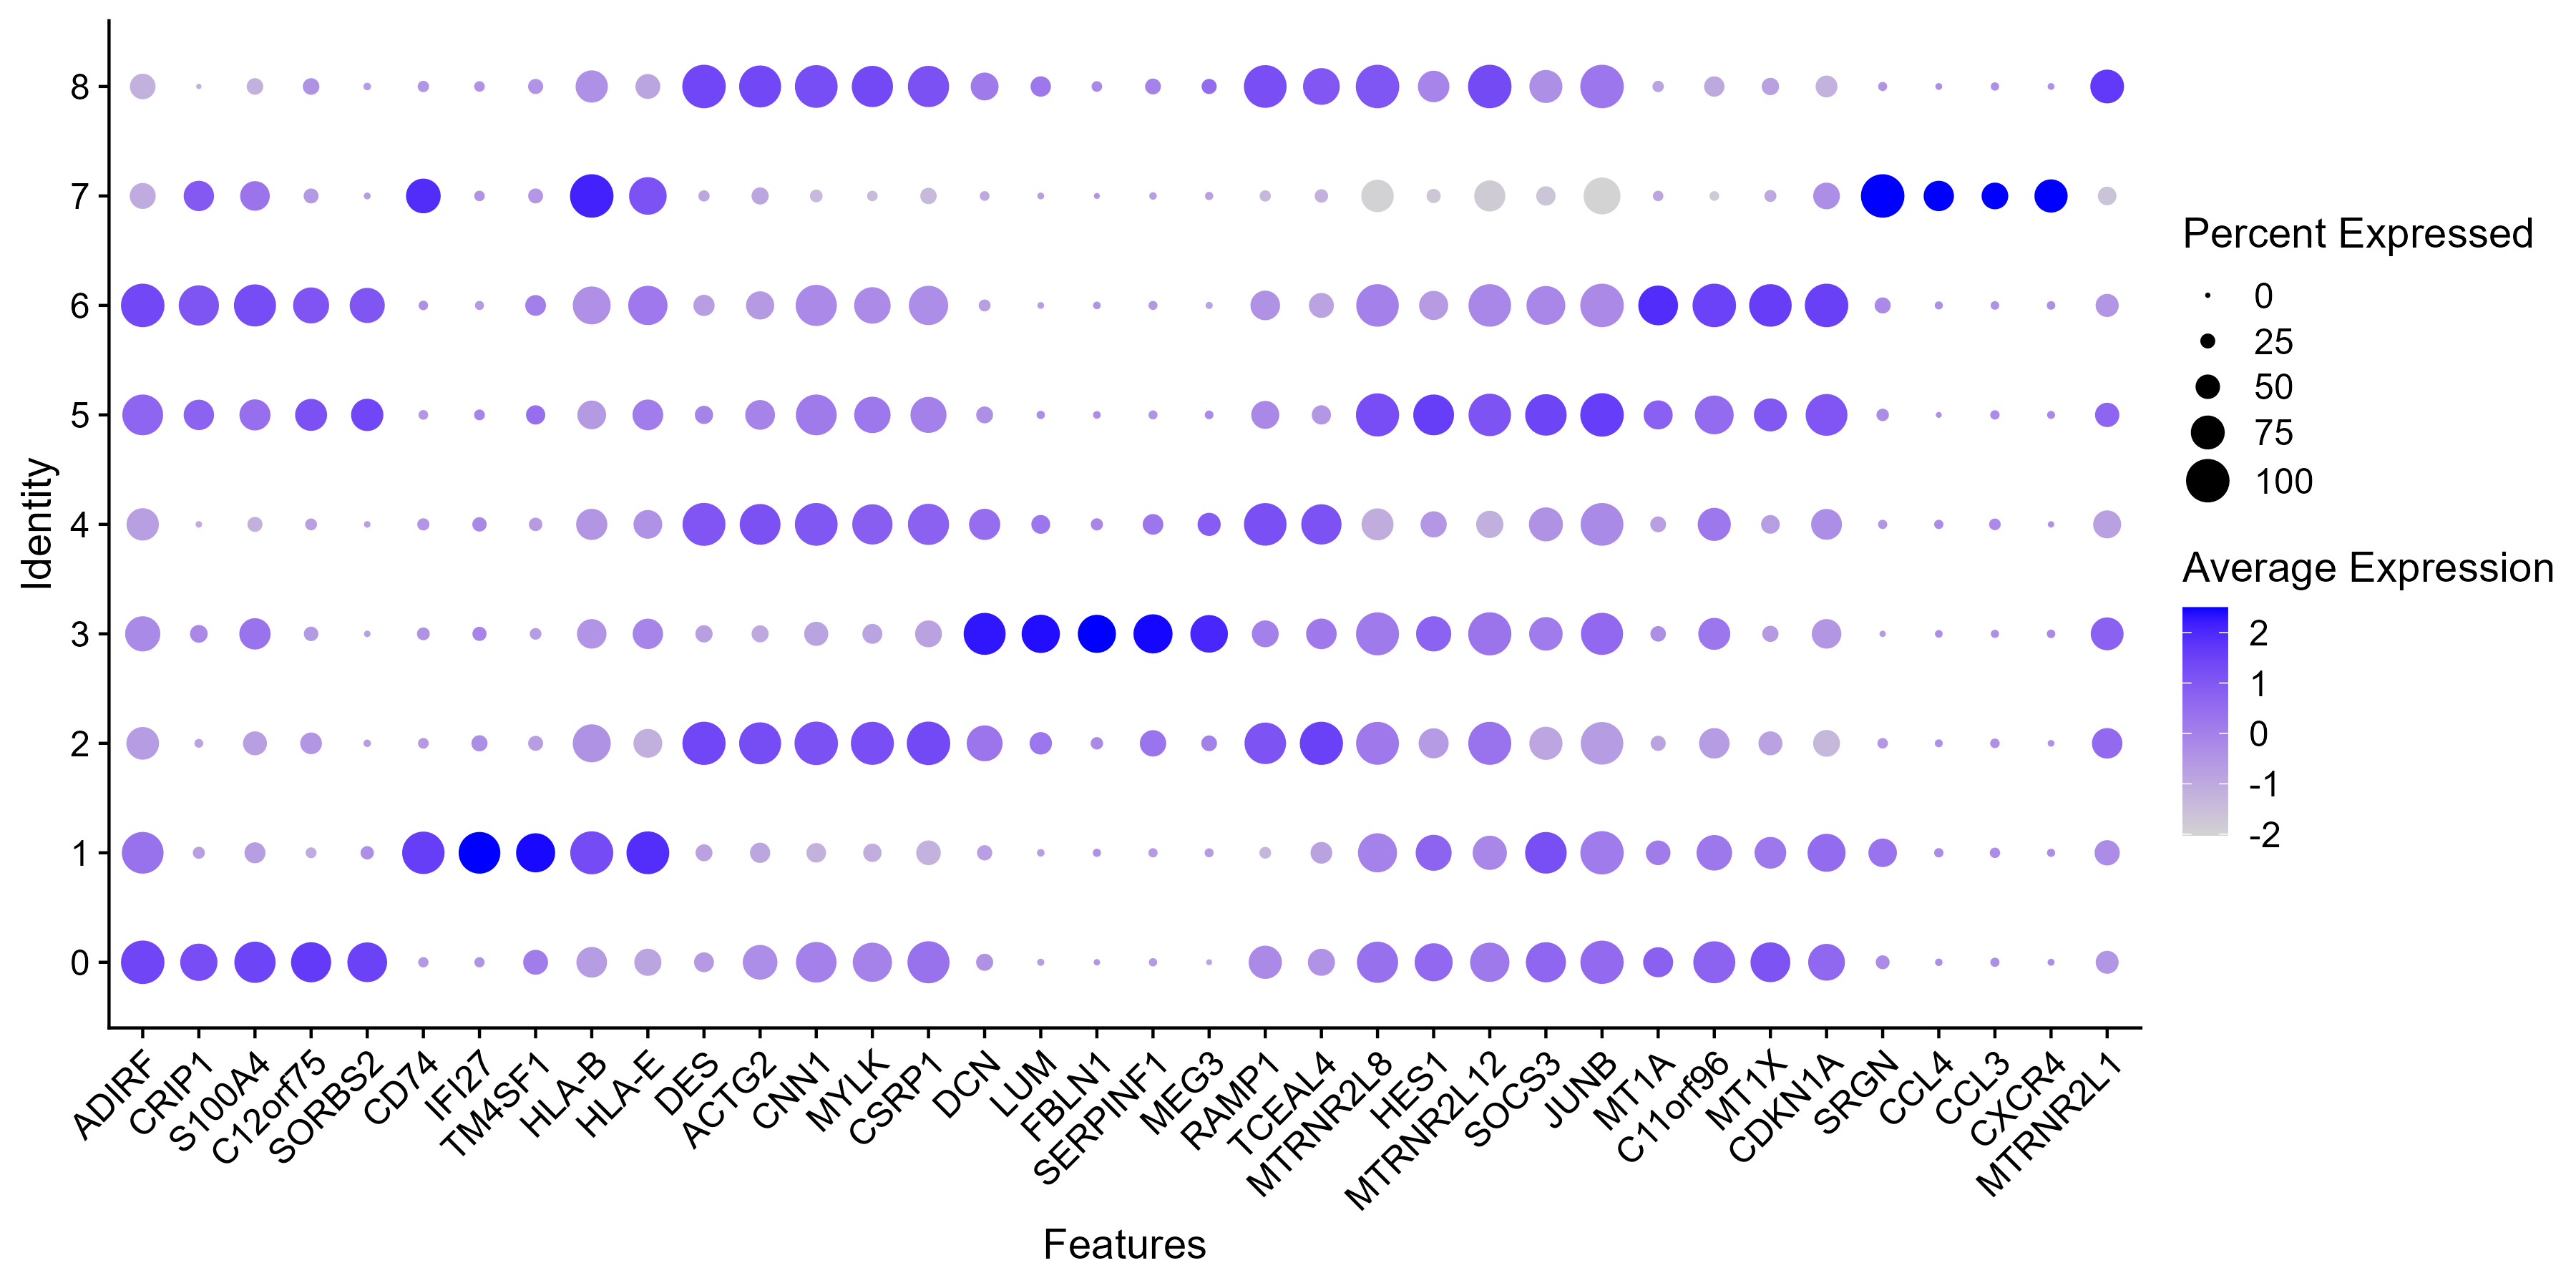
Top-5 marker dotplot and heatmap per cluster:
Step 4 | Switch to your own data
Hand over the folder containing your own data (10X mtx / h5 / h5ad / rds / text matrices / BGI / mixed multi-sample — all fine; input files are never modified, unpacking/exporting goes to <output>/.staging/). If you have grouping information, prepare a two-column sample,group CSV. Paste this prompt:
My own single-cell data is at: <paste the path to your data folder here>.
<Optional: my metadata table (two columns: sample,group) is at: <path>.>
My organism is <human / mouse>.
1. First run the skill's built-in input check (stage 00.5 auto-detects and fixes common format
   problems — 10X mtx / h5 / h5ad / rds / text matrices / BGI). Show me what it detected and
   fixed; if anything needs my decision, ask me before proceeding.
2. IMPORTANT metadata pitfall: the "sample" column in my metadata CSV must contain the FULL
   sample names (e.g., GSM6045825_wt_filtered_gene_bc_matrices_h5_1), not just the GSM number —
   otherwise samples silently fail to match and the run degrades to exploration mode. Verify
   that every metadata row matched a real sample before continuing, and show me the match table.
3. If my data is compressed as .h5ad.gz / .RDS.gz, decompress it first (some files are even
   double-gzipped — decompress again if R still reports "unknown input format").
4. If my dataset is large (tens of thousands of cells or more), ask me whether to first run a
   downsampled exploration pass (--downsample) before the full run — full runs can take tens
   of minutes to an hour and need most of my 16 GB RAM.
5. Run the full pipeline with the skill's own scripts in scripts/ — do NOT write new analysis
   code from scratch. If the run crashes midway, use --resume to continue from the last
   checkpoint instead of starting over.
6. When the run succeeds, show me the QC plots, UMAPs, marker dotplot/heatmap, and explain
   the REPORT.md line by line.
Wait for the AI agent to finish. The core deliverable is annotated_seurat.rds (a QC-passed, clustered, annotated Seurat v5 object) — keep it safe; pseudotime and virtual knockout both need it.
Step 5 | Read the REPORT.md
Paste this prompt:
Please explain the REPORT.md in my scRNA-seq results folder line by line:
1. What each output file is and what it contains (annotated_seurat.rds, the marker tables,
   annotation_per_cluster.csv, the QC/UMAP/marker figures, the checkpoints);
2. How many cells passed QC per sample, how many clusters were found, and how each cluster
   was annotated — do the SingleR annotations agree with the marker genes? Flag any cluster
   whose identity looks doubtful;
3. If my run used Harmony integration: does the before/after integration UMAP comparison show
   good batch mixing without over-correction?
4. Any warnings or things I should pay attention to.
After explaining, tell me which figures can be used directly in a paper or presentation, and
remind me that pseudotime analysis and virtual knockout are separate skills that both consume
my annotated_seurat.rds.
After reading the AI's explanation, if anything is unclear, just ask it directly.
More analysis
The two downstream skills below both consume this pipeline's annotated_seurat.rds, and are installed in exactly the same way (one-click prompt or zip download). Both also require ≥16 GB RAM + a multi-core CPU:
scRNA-seq pseudotime — scRNA-seq-pseudotime
One sentence: from the annotated Seurat object, learn a trajectory with monocle3, order cells by pseudotime, and find pseudotime-associated genes. You choose the starting point (root cluster / cell type) — a biological decision; the skill prints a cluster → label table to help you choose.
Details & download: /skills/scRNA-seq-pseudotime
scRNA-seq virtual knockout — scRNA-seq-virtual-ko
One sentence: pick a gene, "knock it out" in silico with scTenifoldKnk, and see how the regulatory network changes. Outputs a differential-regulation table and two figures — great for generating candidate mechanistic hypotheses (computational predictions; experimental validation required).
Details & download: /skills/scRNA-seq-virtual-ko